


Aspect Ratios in Landscape Photography
Explore Landscapes #41: How to create an image for a specific purpose (in a specific aspect ratio), such as a print or social media post, while maintaining your composition in-camera.
If you‘re new here, welcome. I’m a professional landscape photographer and hiking/backpacking guide specializing in Joshua Tree National Park. My weekly Monday newsletter is typically a long-form ‘teaching’ article for paid subscribers and workshop attendees. My free Thursday newsletter should interest a wider audience and is typically about my hiking, volunteering, or workshop adventures. I look forward to helping you improve your photography!
The aspect ratio of an image is the ratio of its width to its height, expressed as X:Y.
For example, on my Canon R, a full-frame RAW file is 6720 px wide by 4480 px high, i.e., an aspect ratio of 6720:4480 which can be simplified to 3:2 (as 3 x 2240 = 6720 and 2 x 2240 = 4480).
A scene photographed on two different cameras at the same aspect ratio may have different resolutions (i.e., the total number of pixels in the image) depending on the size of the sensor and, therefore, the number of pixels in each camera.
How you display your image and/or where you publish it will determine what aspect ratio you may want to shoot or crop down to.
Typical ‘native’ aspect ratios for DSLRs and Mirrorless Cameras (both full-frame and crop-frame) are either 3:2 or 4:3. A camera's native aspect ratio is that of its complete sensor area. For example, a full-frame camera has a sensor size of 36 mm x 24 mm (equivalent to 35 mm film) and an aspect ratio of 3:2.
This post is a bit on the long side, and Substack is telling me it may get truncated when delivered to your email inbox. If so, please click ‘View in browser’ at the top right of the email.
Many other aspect ratios have been used for cameras, such as 6x4.5, 6x6, 6x7, 6x9, 6x12, 6x17, and 5x4.
Images with an aspect ratio of 1:1 (i.e., square) became popular again with the launch of Instagram, which featured only this aspect ratio for any image posted to the app. The user’s grid still displays all images as 1:1 aspect ratio images, but you can also upload other aspect ratios now, a popular one being 4:5 for vertical orientation images.
The aspect ratio of 16:9 is now standard on most televisions, and most people will be familiar with this aspect ratio also being expressed as either HD (1920 px x 1080 px) or 4K (3840 px x 2160 px).
Suppose you need to create an image in a specific aspect ratio for a specific purpose, such as a social media post, for example, an Instagram story (9:16). In that case, it’s good to compose your image at that aspect ratio in-camera. This ensures the composition you want reliably, rather than shooting at the native aspect ratio and hoping you can crop later.
Paper sizes for prints are all over the place concerning aspect ratio. The old cut film size of 4in x 5in led to print sizes of 4x5, 8x10, and 16x20 (inches). Negatives taken on 5in x 7in cameras led to 5x7 prints. The 35mm format (36mm x 24mm), being 3:2, doesn’t fit either of those size papers and must be cropped. The only newer paper sizes that fit the current ‘native’ aspect ratios are 22x17 (the 4:3 ratio printed at 20x15 with a one-inch border) and 19x13 (the 3:2 ratio printed at 18x12 with a half-inch border).

Most DSLRs (in Live View) and mirrorless cameras will allow you to compose an image using different aspect ratios in-camera.
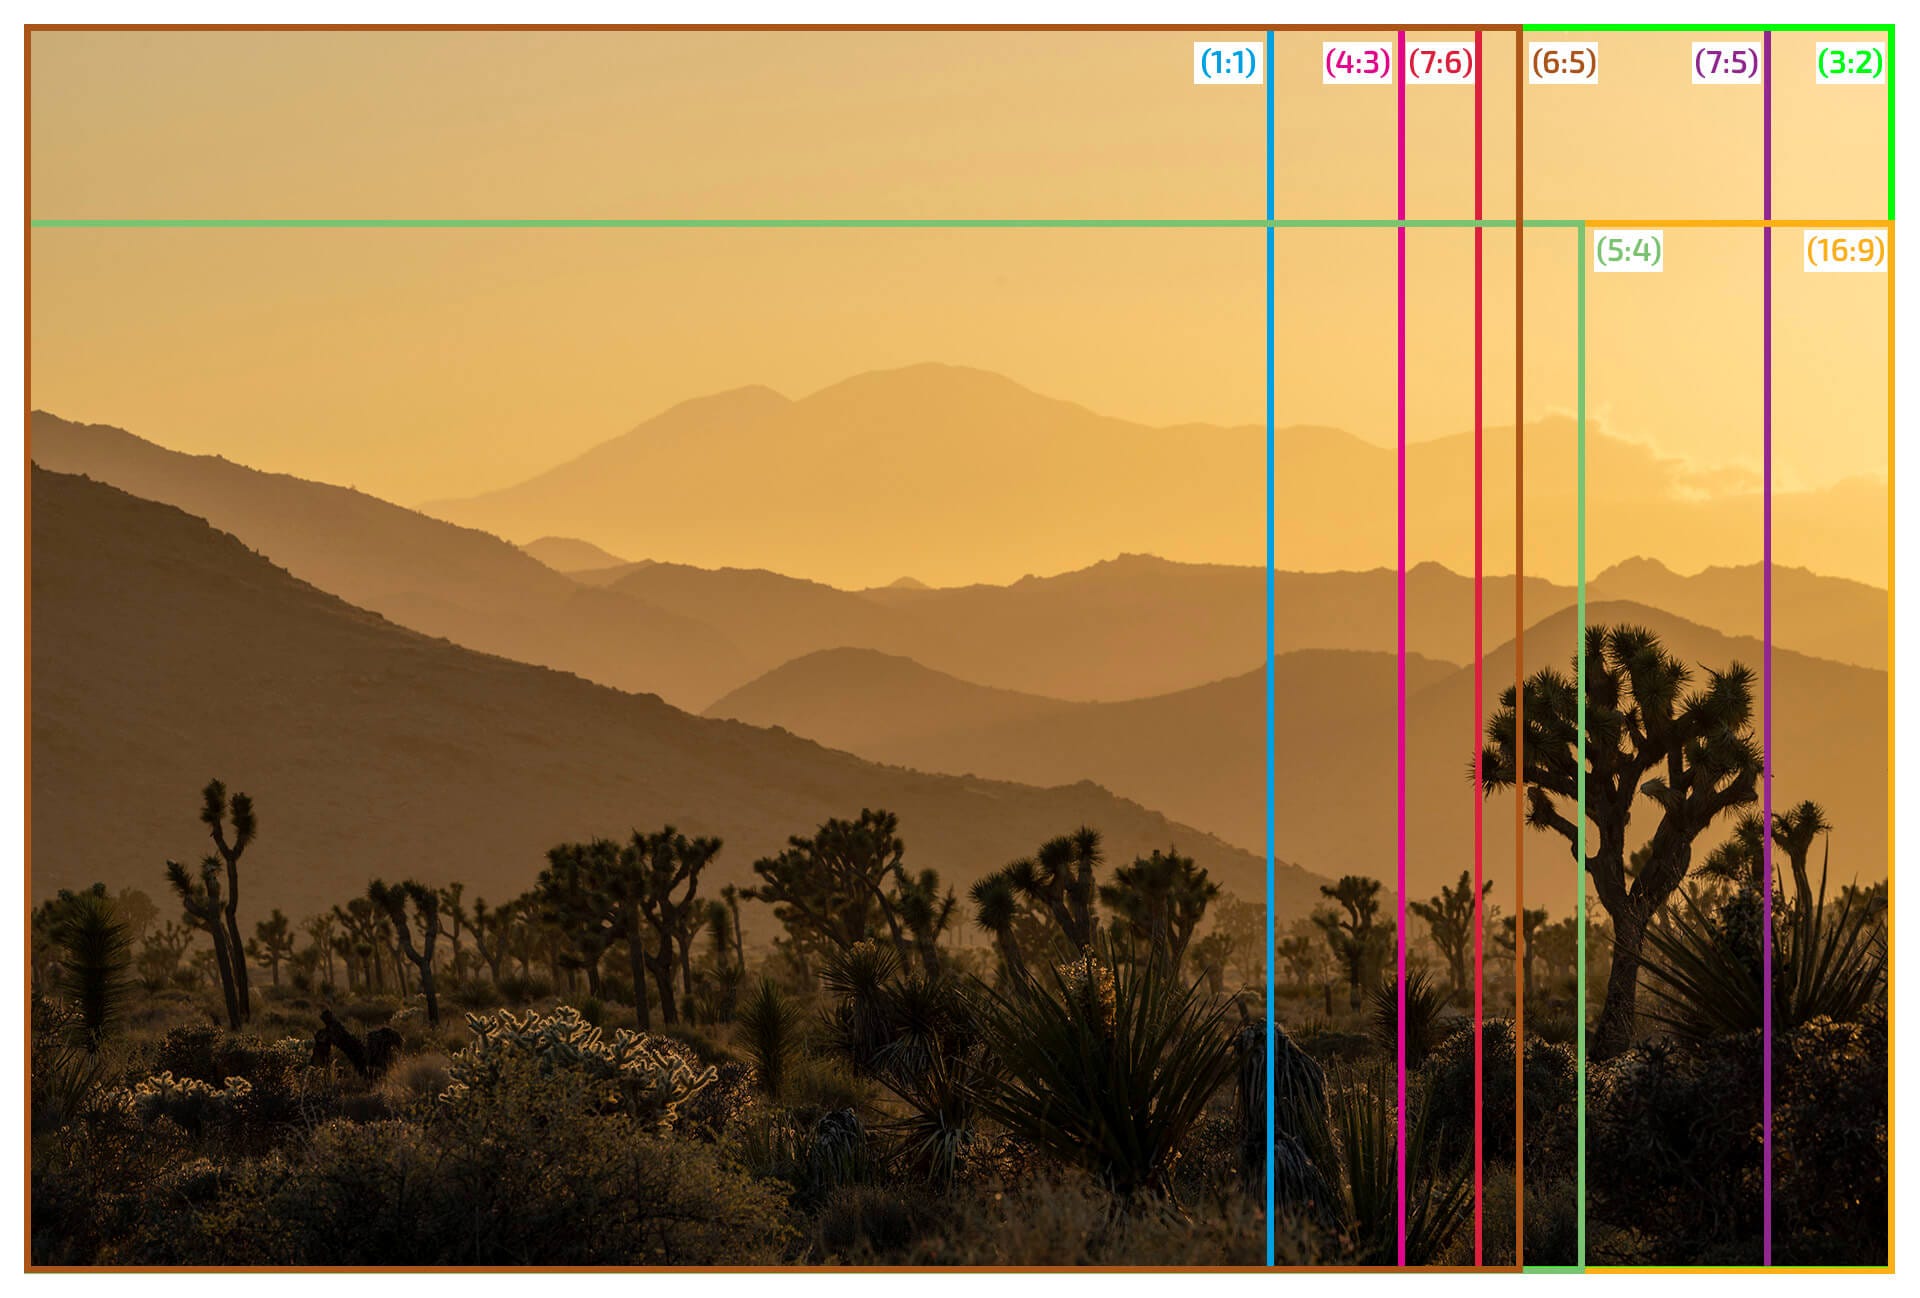
My Canon R camera allows me to compose images at eight different aspect ratios:
6720 x 4480 (30.1 MP) = 3:2 the native, full-frame resolution
4480 x 4480 (20.1 MP) = 1:1
5952 x 4480 (26.7 MP) = 4:3
6720 x 3776 (25.4 MP) = 16:9
5600 x 4480 (25.1 MP) = 5:4
5376 x 4480 (24.1 MP) = 6:5
5228 x 4480 (23.4 MP) = 7:6
6272 x 4480 (28.1 MP) = 7:5
I have sixteen different aspect ratios, considering you can orientate your camera horizontally or vertically. Your camera may have more or fewer aspect ratio options than mine, but the logic behind the menu options should be similar.

I can view four pairs of aspect ratios in the EVF (or on the camera back screen) either with the aspect ratio masked off (showing black bars on either side) or as an outline with blue lines to still see what’s outside the capture area.

The other four pairs of aspect ratios can only be viewed as outlines (i.e. with the blue bars). For some reason that I don’t really understand, Canon chose to have the aspect ratios on two different menu pages.


Shooting with the blue lines (outline mode) is more useful, in my opinion, as you can easily see whether you need to recompose to include or exclude something from your scene.

In playback, after you’ve taken your image at one of the non-native resolutions, you’ll see the whole uncropped image with the blue lines showing the composition's edges at your selected aspect ratio.

The camera will save the complete image regardless of the aspect ratio you selected in the camera. This can be useful if, at a later date, you wish to change/adjust the aspect ratio. You can save your images to your memory card with the cropping information embedded into the saved file.
If you open that saved file in Photoshop, it will open as the cropped image - i.e. Photoshop knows to use the embedded cropping information and displays the cropped image.
In Lightroom, the image will open as the full image and will not be cropped. If you want to import the cropped image into Lightroom, open it first in Photoshop, save the file as a PSD, and then import that PSD file into Lightroom. You’ll then have the cropped image file (as you composed it) in Lightroom, and you can then post-process the image.
Do you need help with camera setup, or is there a specific technique you’d like to learn or improve upon?
Would you like help with post-processing, a review of your photography portfolio, or feedback/tips on improving?
I'm available for one-to-one photography mentoring sessions. These are focused on helping you get the most out of your photography, providing online photography critique, and improving your landscape photography technique.
Online photography mentoring is available as individual sessions (1 hour, 1.5 hours, or 2 hours). Mentoring sessions are conducted over an online video conferencing service and are focused on the subject(s) you want to cover.
Here are a few of my posts that you might be interested in reading:


Interesting musings, images, and art from others:
Photos of the Week by Benjamin Williamson
Reaching a higher level might require letting go of the things you can't control by Seth Werkheiser
Get a Backstage Pass to SmallStack by Robin Taylor
Rising: A New Twist on a Familiar Story by Sydney Michalski
May Flowers by Rachel Jeffrey
Climate Change: A serious downer for mountain streams by Jonathan P. Thompson
All About Image Licensing 🫱🏼🫲🏽 by Paul Zizka
Abstract flowers by Kevin Hansen
Nature Macro: Creepy Crawlies by Kewtiebird
The Butterfly of Doom and Light by Bryan Pfeiffer
Bushwhacking the road less travelled by Jane Heinrichs