
Trust Your Histogram
Explore Landscapes #11: As a thank-you to my new Substack subscribers and to introduce myself, I'm reposting some of my most popular blog posts over the next few weeks.

Back in 2011, I attended a seascape/landscape photography workshop on the south coast of the UK in Dorset. The workshop was led by a wonderful photographer, Helen Rushton. Helen taught me three very valuable lessons that have shaped how I photograph today:
As far as possible (aka always), shoot seascapes and landscapes with your camera on a tripod.
How to use ND, ND Grad, and Polarizer filters.
Always trust your histogram when determining exposure.
Trusting your histogram is the focus of this post and is an essential part of my workflow every time I take a photo.
Measuring Light and Determining Exposure
Metering is the traditional method of measuring the amount of light reaching your camera’s sensor - see Image 1.
The center of the scale is 0 - where the camera's meter thinks the image is correctly exposed.
If the pointer moves to the left (negative), it’s underexposed.
If the pointer moves to the right (positive), it’s overexposed.

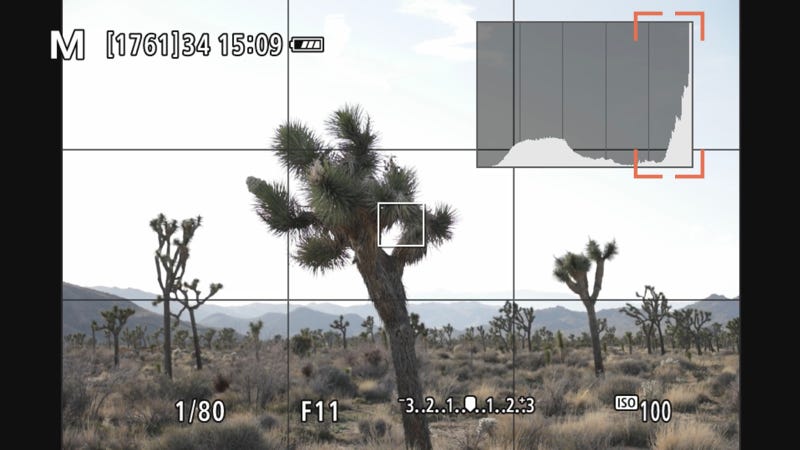
A histogram can be displayed during shooting (on mirrorless cameras) or be reviewed after shooting (on DSLRs) - see Image 2.
The histogram is a bar graph that shows the 256 different tones, from pure black (on the left) to pure white (on the right).
The height of each bar shows the number of pixels that appear in the image of that tone.
It is far more accurate than relying on camera metering, which is far more accurate than relying on the camera’s display screen.

In Image 3, the histogram butts up against the right-hand edge, indicating that some whites are clipped; however, the meter shows a correct exposure. If you relied on the meter, you would have taken an overexposed image with no detail in the clipped area.

As you (or the camera) change your exposure settings (depending on your shooting mode, for example, Program, Aperture Priority, or Manual), the histogram will change shape and move to the right or left - see Images 4 and 5.
Using the histogram, you can adjust the camera settings that affect exposure (aperture, shutter speed, and ISO) to ensure you capture the full range of tones in the scene.
The intent is to position the histogram so that the graph profile touches the bottom and does not get clipped on the left-hand or right-hand side.
This ensures that you don’t have any blown-out areas (pure white) or detail-free shadows (pure black).
The shape of the histogram is not essential and is purely a result of the different tones in the scene you’re shooting.

Sometimes, it is impossible to position the histogram graph without clipping the whites, blacks, or both when photographing sunrise, sunset, or other high-contrast scenes.
This is because the scene's dynamic range (the difference between the brightest and darkest parts of the image) exceeds what the camera’s sensor can capture in a single image.
In this case, you can use exposure bracketing to take a range of images with different exposure settings. These bracketed images are then combined in post-processing to create a final shot showing the scene's full dynamic range.
If you have any questions on my workflow or any other topic I've mentioned, please comment below, and I'll get back to you.
Thank you, Jon, for teaching me something new! As a self-taught photographer, I've never thought about using the histogram! This is very helpful!
Great post Jon! I don't think I learned anything about using the histogram when I took a photography class a few years back.