


Landscape photography ‘must have’ filters
Explore Landscapes #88: While many filter affects can be replicated during post-processing, there are two types of filter affects that can't be replicated in post, and need to be created in-camera.
I’m often asked during workshops about filters for landscape photography. With that in mind I thought I’d share my thoughts/views on filters and why they should have a place in your photography backpack.
This post is a bit long, and Substack tells me it may be truncated when delivered to your email inbox. If so, please click ‘View in browser’ at the top right of the email.
There are a multitude of filters available on the market today, however, there are only two types of filters that I would consider as essential for landscape photography.
The two types of filters that I consider essential affect your whole image: 1) circular polarizers and 2) neutral density filters. I’ll talk about what each filter does in the next section.
The reason for them being ‘essential’ is that their affect cannot be replicated in post-processing. You have to create the ‘filtered’ image in-camera. Note, when I’m talking about post-processing I’m referring to conventional post-processing in Lightroom and/or Photoshop that is not relying on AI-powered tools.
There are other filters which, while not essential, allow you to reduce the amount of post-processing that you have to do to get to the final image that you’re trying to achieve.
Before I get into describing what affect each filter has on your images there’s another comparison that I need to make.
Rectangular (and Square) Filters vs Circular Filters
Filters come in two principal formats: rectangular or circular. There’s much discussion about what filter format is best. I really think it comes down to how you want to use your filters, the type of filters that you’re going to use, and your selection of lenses.

I prefer the rectangular filters for two principal reasons:
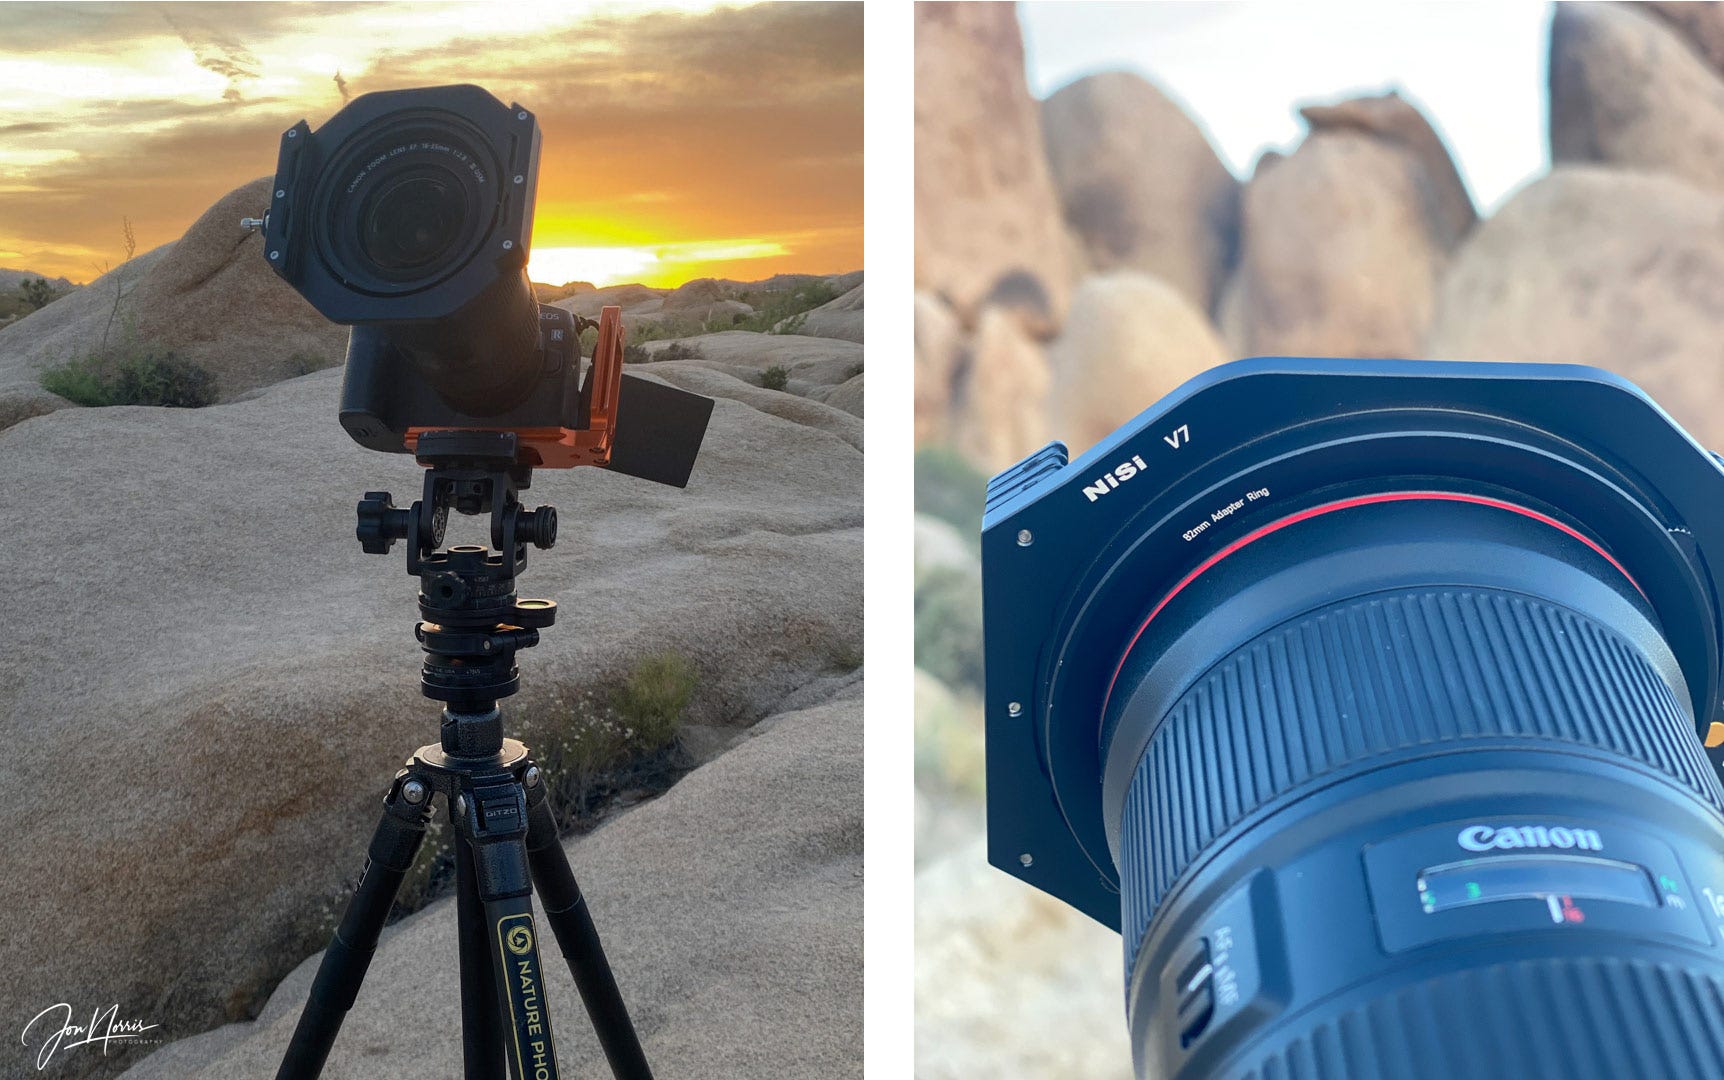
I can stack rectangular filters (up to three of them in the Nisi V7 filter holder that I use) and move them up and down relative to each other to position, for example, a graduated filter along the horizon of the scene that I’m shooting. I can also add to that stack a circular polarizer that I can rotate independently of the rectangular filters.

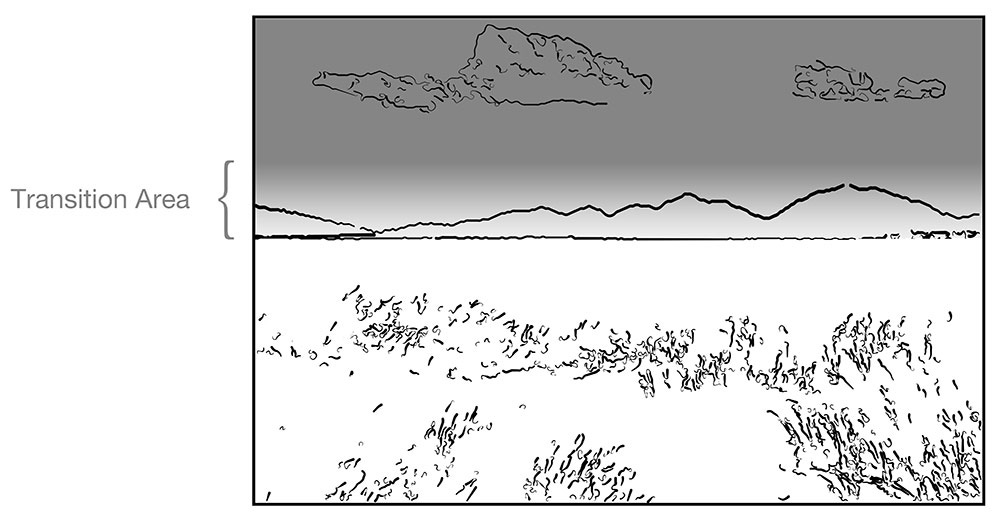
Sketch showing the view through the lens when positioning a graduated neutral density filter on the horizon (Image courtesy of Nisi Filters) I can have one set of filters that will fit every lens that I own as the Nisi V7 filer holder has adaptor rings available for every lens size on the market. So, I can use the same filter setup on my 24-205mm lens (77mm dia. filter size) as my 16-35mm lens (82mm dia. filter size) just by adding an adaptor ring to each lens.
With a circular filter you can not move the filter laterally up/down, and you may need additional filter sets for each lens diameter that you have.
NOTE: I use Nisi filters and am an authorized Nisi reseller, however, I paid for my filters and advocate for them because I believe that Nisi filters have superior optical quality, almost no color-cast, and are reliable in the harshest of conditions.
Essential Filters
Circular Polarizer (CPL)
Neutral Density (ND)
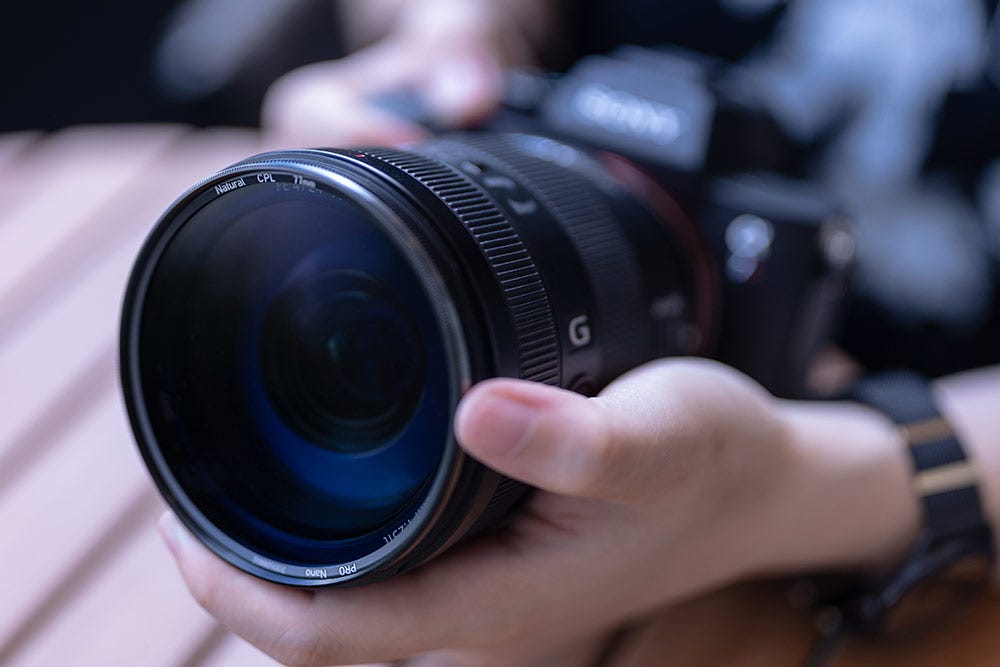
Circular Polarizer (CPL) Filters
In photography, polarized light can have a major impact on the quality of a scene you are trying to capture. Polarized light is light that has been scattered and dispersed at varying angles due to moisture in the atmosphere, pollution or due to reflective surfaces.
Essentially a circular polarizer has two individual elements – one of which can be rotated to only allow wavelengths of polarized light to enter the camera at a specific angle. The degree of rotation of the filter will impact which single angle of polarized light you will capture – with the aim of reducing the light reflecting off surfaces like water and glass, intensifying the blues of the sky and contrast and texture in clouds, increasing saturation and vibrance of foliage and allowing your camera to capture what is under the surface of shallow water.
Circular polarizing filters work best when the sun is at a 90 degree angle to the subject you wish to shoot, with varying degrees of impact depending on where exactly the sun is situated. When shooting directly into or perpendicular to the sun, or when the sun is positioned in front of and above the camera, a circular polarizer will have the least impact.
By forming an “L” shape with your thumb and forefinger, and pointing your finger towards the sun, your thumb should point towards the directional plane where a circular polarizer will have the most benefit in your scene.
Use a CPL to intensify blue clouds
Using a circular polarizing filter can intensify the blue colors of the sky by cutting out the haze and light reflecting at various angles through moisture and other elements of the atmosphere.
During the middle of the day when the sun is higher in the sky, a circular polarizer will have the most impact on blues in the sky directly above the horizon (remembering polarizing filters work best at a 90-degree angle to the direction of the sun).
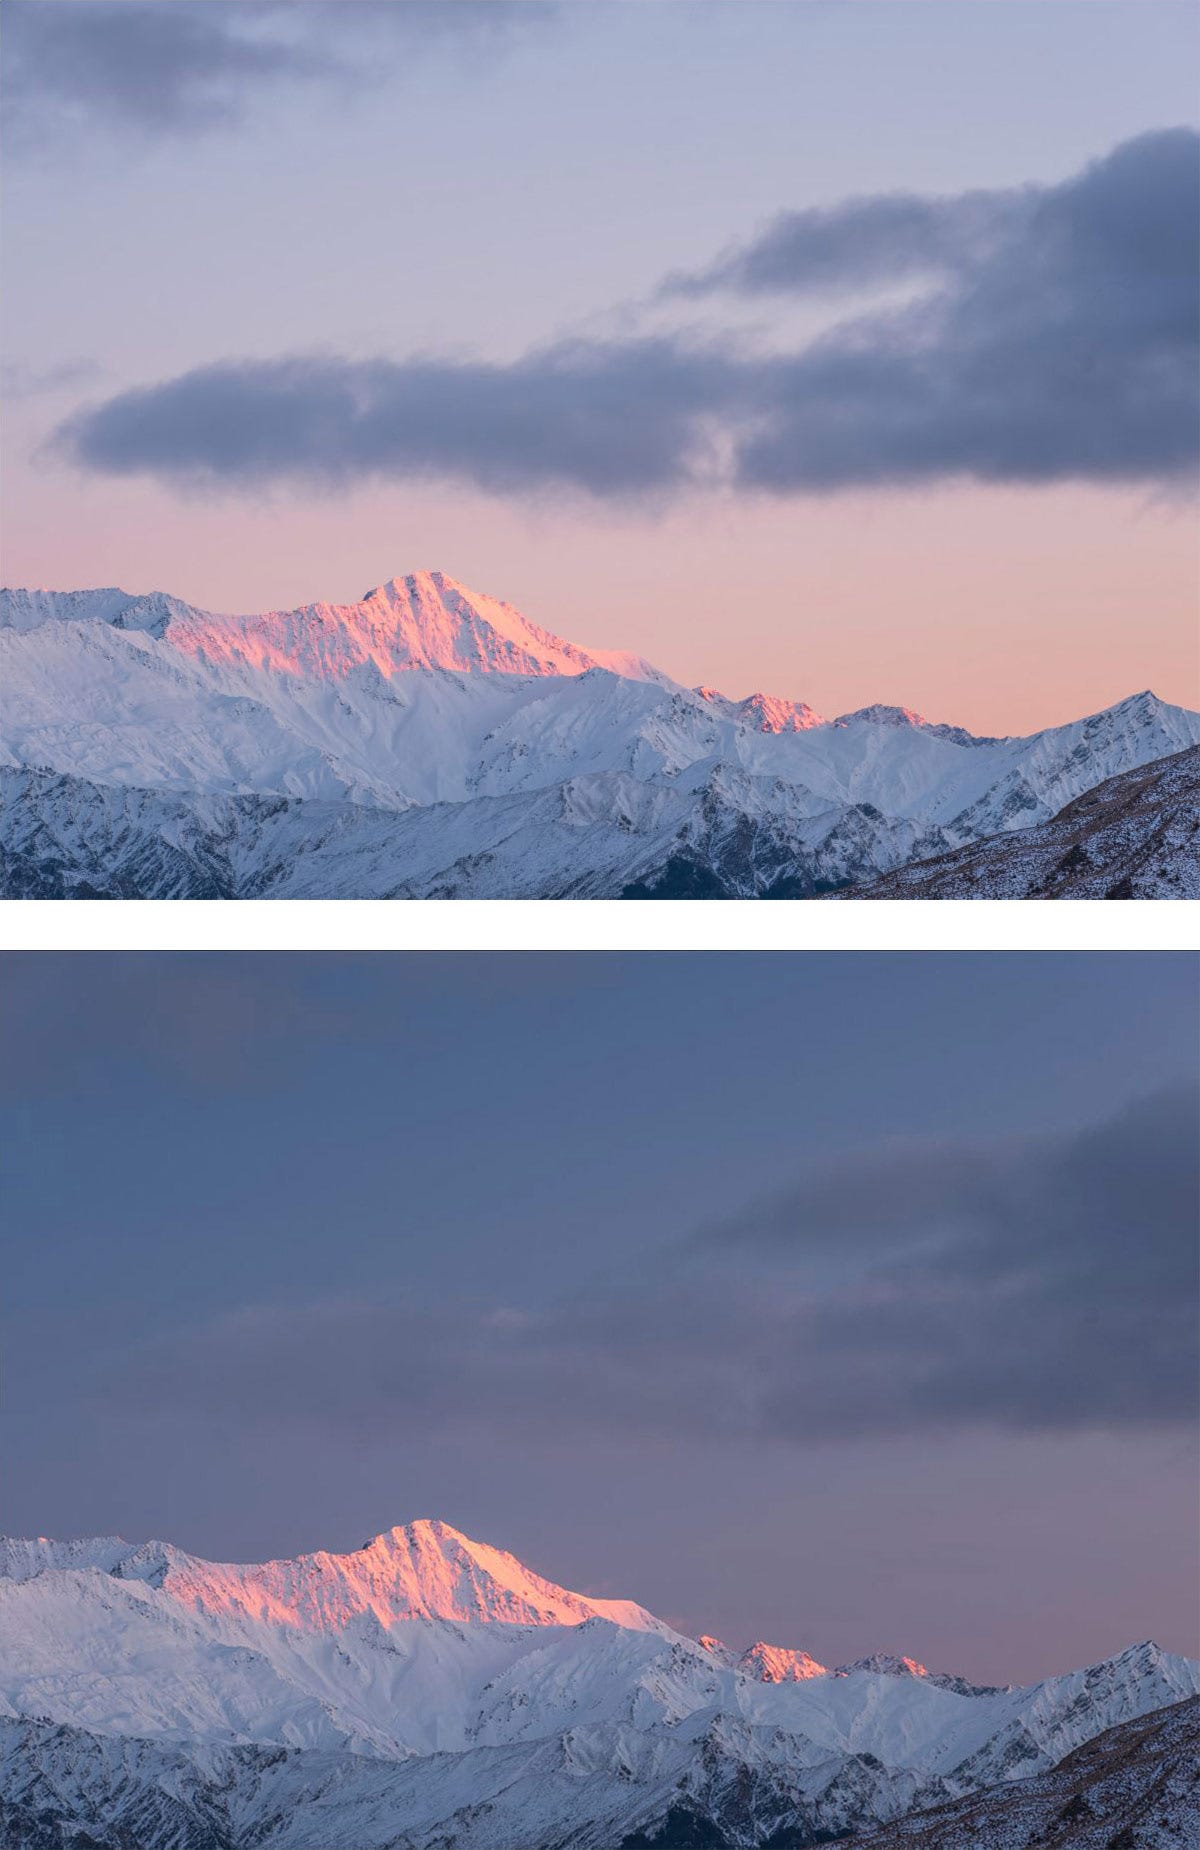
When the sun is lower in the sky in the early morning or late afternoon, the polarizing effect is less noticeable at the horizon and can lead to uneven polarization which is seen as a variation in the intensity and saturation of the blues, possibly leading to darker, patchier parts of the sky appearing in some parts of your images. This is more apparent when using ultra-wide angle lenses. To avoid this uneven polarization do not use a polarizing filter on any lens with a focal length (full-frame equivalent) of 24mm or wider.
When used correctly, circular polarizers will provide more contrast between the sky and the clouds, or clouds above a body of water, making clouds seem as if they pop out of your images. Even with a grey cloudy sky, using a circular polarizing filter can increase contrast and texture in different areas of the sky, creating a moodier impact on the scene.
Use a circular polarizer to remove reflections from water and other surfaces
Another reason photographers use circular polarizers is to reduce the reflected light from the surface of water, glass, wet rocks and other shiny surfaces. By rotating the polarizer for maximum effect, you will only be allowing light reflecting from certain angles to enter the camera and hit the sensor. This can allow you to see into shallow water, see straight through glass that has reflections behind it and potentially manipulate the angle of light reflections coming from curved metal surfaces such as a car or other vehicle.
Reflections caused by water on surfaces like sand, grass, leaves or other foliage and rocks can also be reduced with a CPL. This can have a huge positive benefit on scenes like waterfalls, images captured early in the morning or after rain when there is water on the ground or other surfaces.
Use a circular polarizer to saturate foliage colors
When light reflects through the atmosphere and off the surfaces present in any landscape scene, the dispersion of light can cause leaves, grass and other foliage to lose some of its color intensity when a camera captures it, therefore potentially decreasing the natural saturation and vibrancy of greens and yellows.
By using a circular polarizer to capture the wavelengths of light in a singular angle, you can maximize the natural color saturation bringing vibrancy back to foliage.
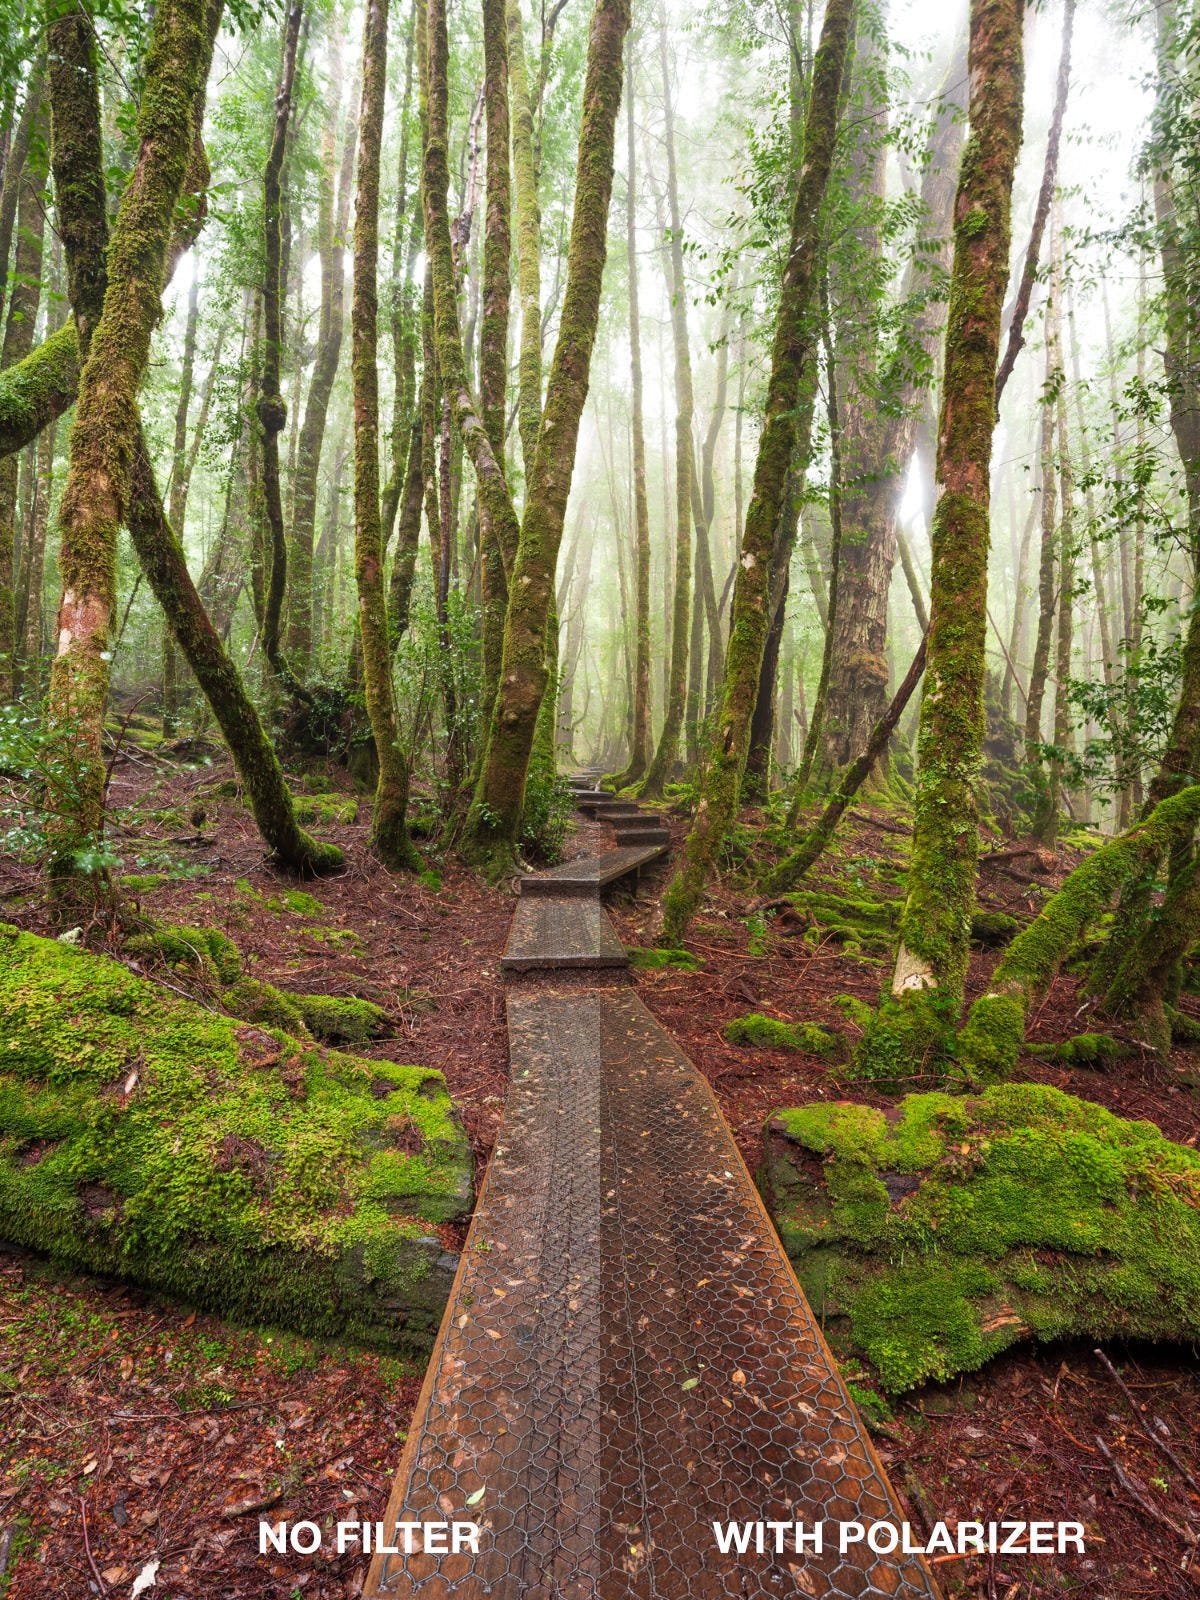
Circular polarizers are perfect for forests scenes where there is a lot of green foliage like moss, ferns and trees. These types of scenes tend to have a lot of water on various surfaces, and light bouncing around in all directions as it reflects off the moisture.
Disadvantages of using a Circular Polarizer
Uneven polarization can occur
As mentioned above, a circular polarizer works best when the sun is at a 90 degree angle above or behind the camera. If the direction of the light is coming from the sides, or in front of the camera, uneven polarization and a noticeable graduation and patchiness in the colour of the sky can occur.
Ultra-wide angle lenses are not best used with circular polarizers
Shooting with ultra-wide angle lenses (wider than 24mm focal length) can also cause uneven polarization when shooting perpendicular to the angle of the light. You will notice less of this color variation in the sky when using mid-range or telephoto lenses.
Circular polarizers reduce the available light
Depending on the brand and quality of circular polarizer being used, you may see a reduction of light between 1 to 3 stops. This means you may need to increase your exposure time, ISO or shutter speed to compensate for this variation. Our NiSi circular polarizer range will reduce the light by 1 - 1.5 stops of light.
Neutral Density (ND) Filters
Being able to capture time or movement in our images gives us total control of our creativity. Being able to capture this and control light allows us to turn a good photo into a great one! Some common examples of movement we can capture include smoothing or softening of water, emphasizing water flow, smoothing or softening of clouds, creating cloud movement and removing moving objects.
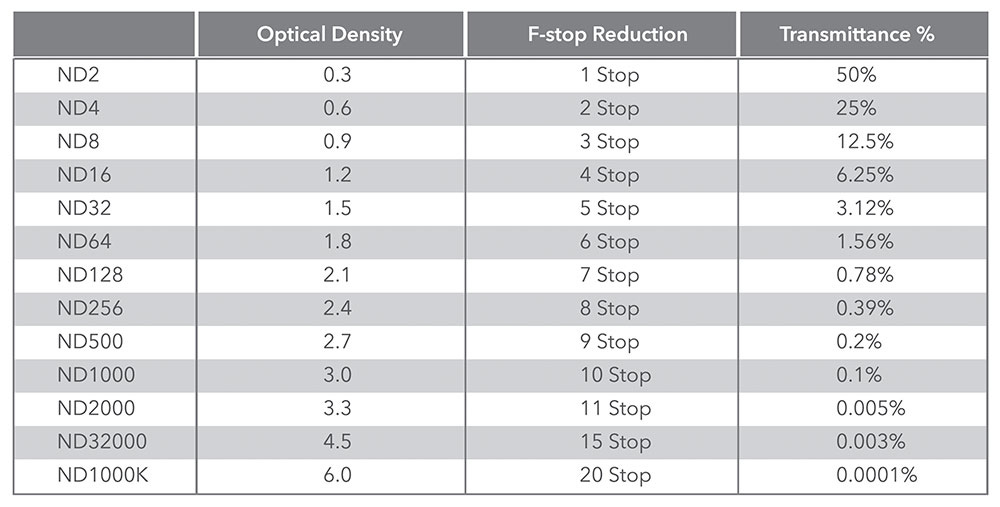
Neutral Density filters come in a range of ‘strengths’ that reduce the amount of light reaching your camera’s sensor. This reduction, in the case of Nisi Filters, can be from a 1-stop to a 20-stop reduction.
The ND number equals 2 to the power of the number of stops of light reduction, for example, a 3-stop ND filter is an ND8 (2*2*2 = 8). A 4-stop ND filter is an ND16 (2*2*2*2=16).
The following examples show the affect of using different strength ND filters.
Using an ND8 (3-Stop) Filter to capture water flow with a shutter speed of 0.25 secs to 0.5 sec
The ND8 is quite possibly the perfect filter for capturing water flow and motion while maintaining dramatic texture. The 3-stop light reduction will slow the shutter speed down just enough to show a sense of movement in lower light situations such as at sunrise or sunset.
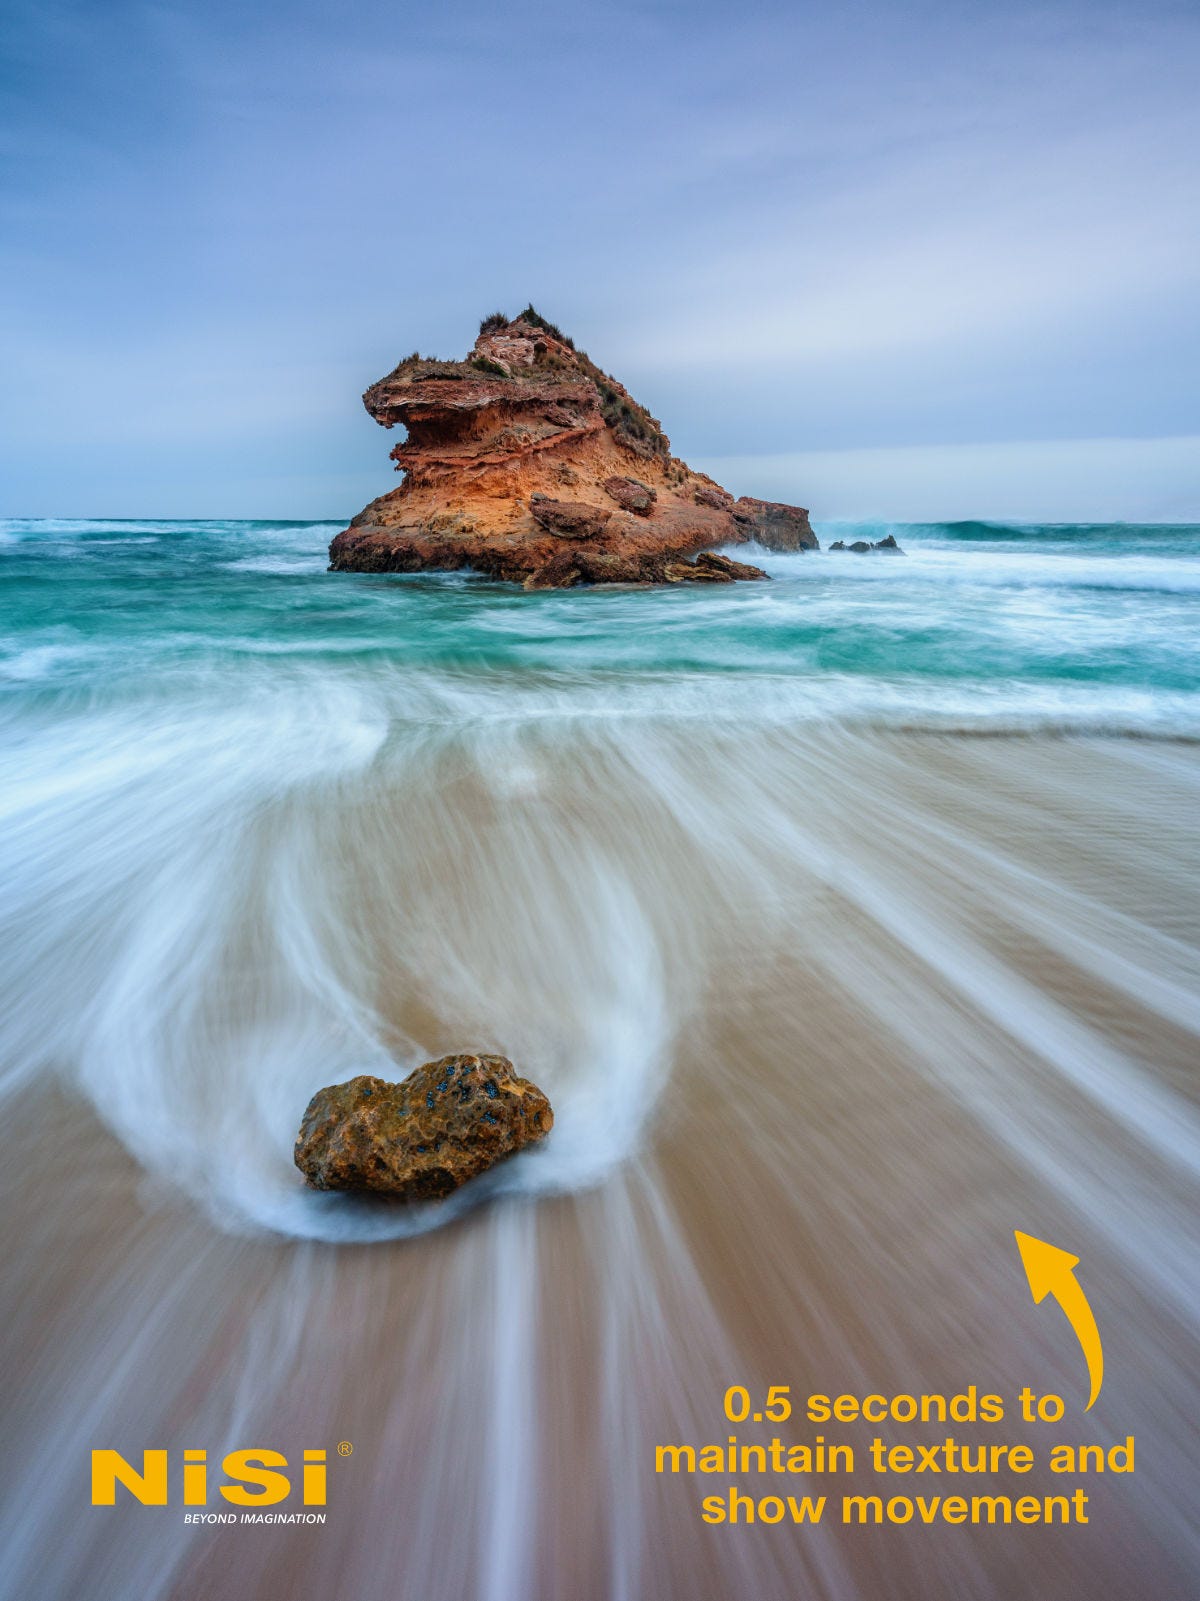
Shutter speeds of 0.25 secs to 0.5 secs will generally help to maintain texture in faster-moving water. Slower shutter speeds of 1 second - 2 seconds will suit slower moving water. A good tip to remember is water that is receding tends to flow out at half the speed of incoming water, and extra impact can be created by using this reverse movement in your images.
Using an ND64 (6-Stop) Filter to smooth moving water with a shutter speed of 30 sec to 2 min
When shooting in lower light situations like sunrise and sunset, an ND64 will allow for long exposures times to create silky smooth water and soft clouds for images portraying a longer sense of time passing. It is not uncommon to have exposure times in the range of 0.5 second - 3 seconds and even longer without using filters at sunrise and sunset.
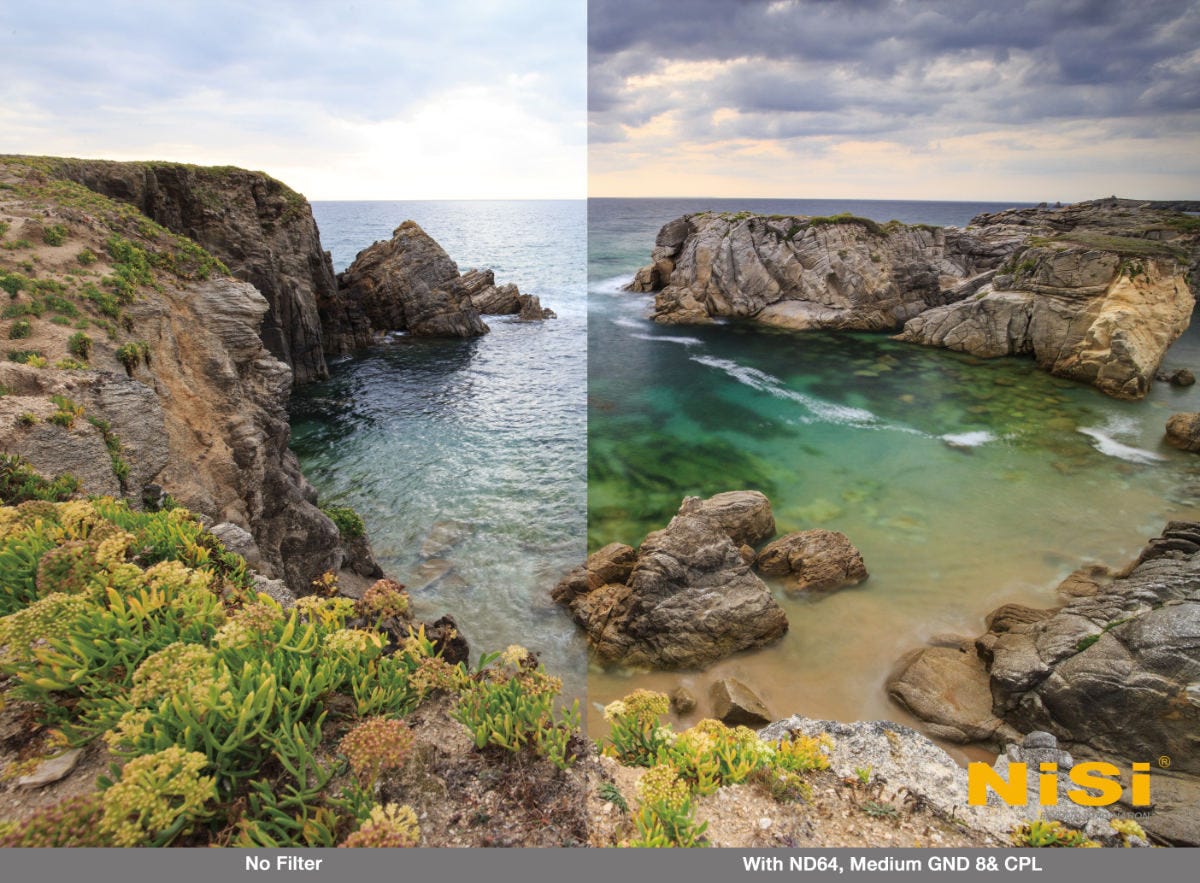
The 6-stop reduction of light that an ND64 gives can slow shutter speeds down to 30 seconds - 2 minutes in situations like this. In brighter light like in the example image above, an ND64 will smooth the water just enough for the silky smooth effect while adding a softer texture to slower-moving cloud.
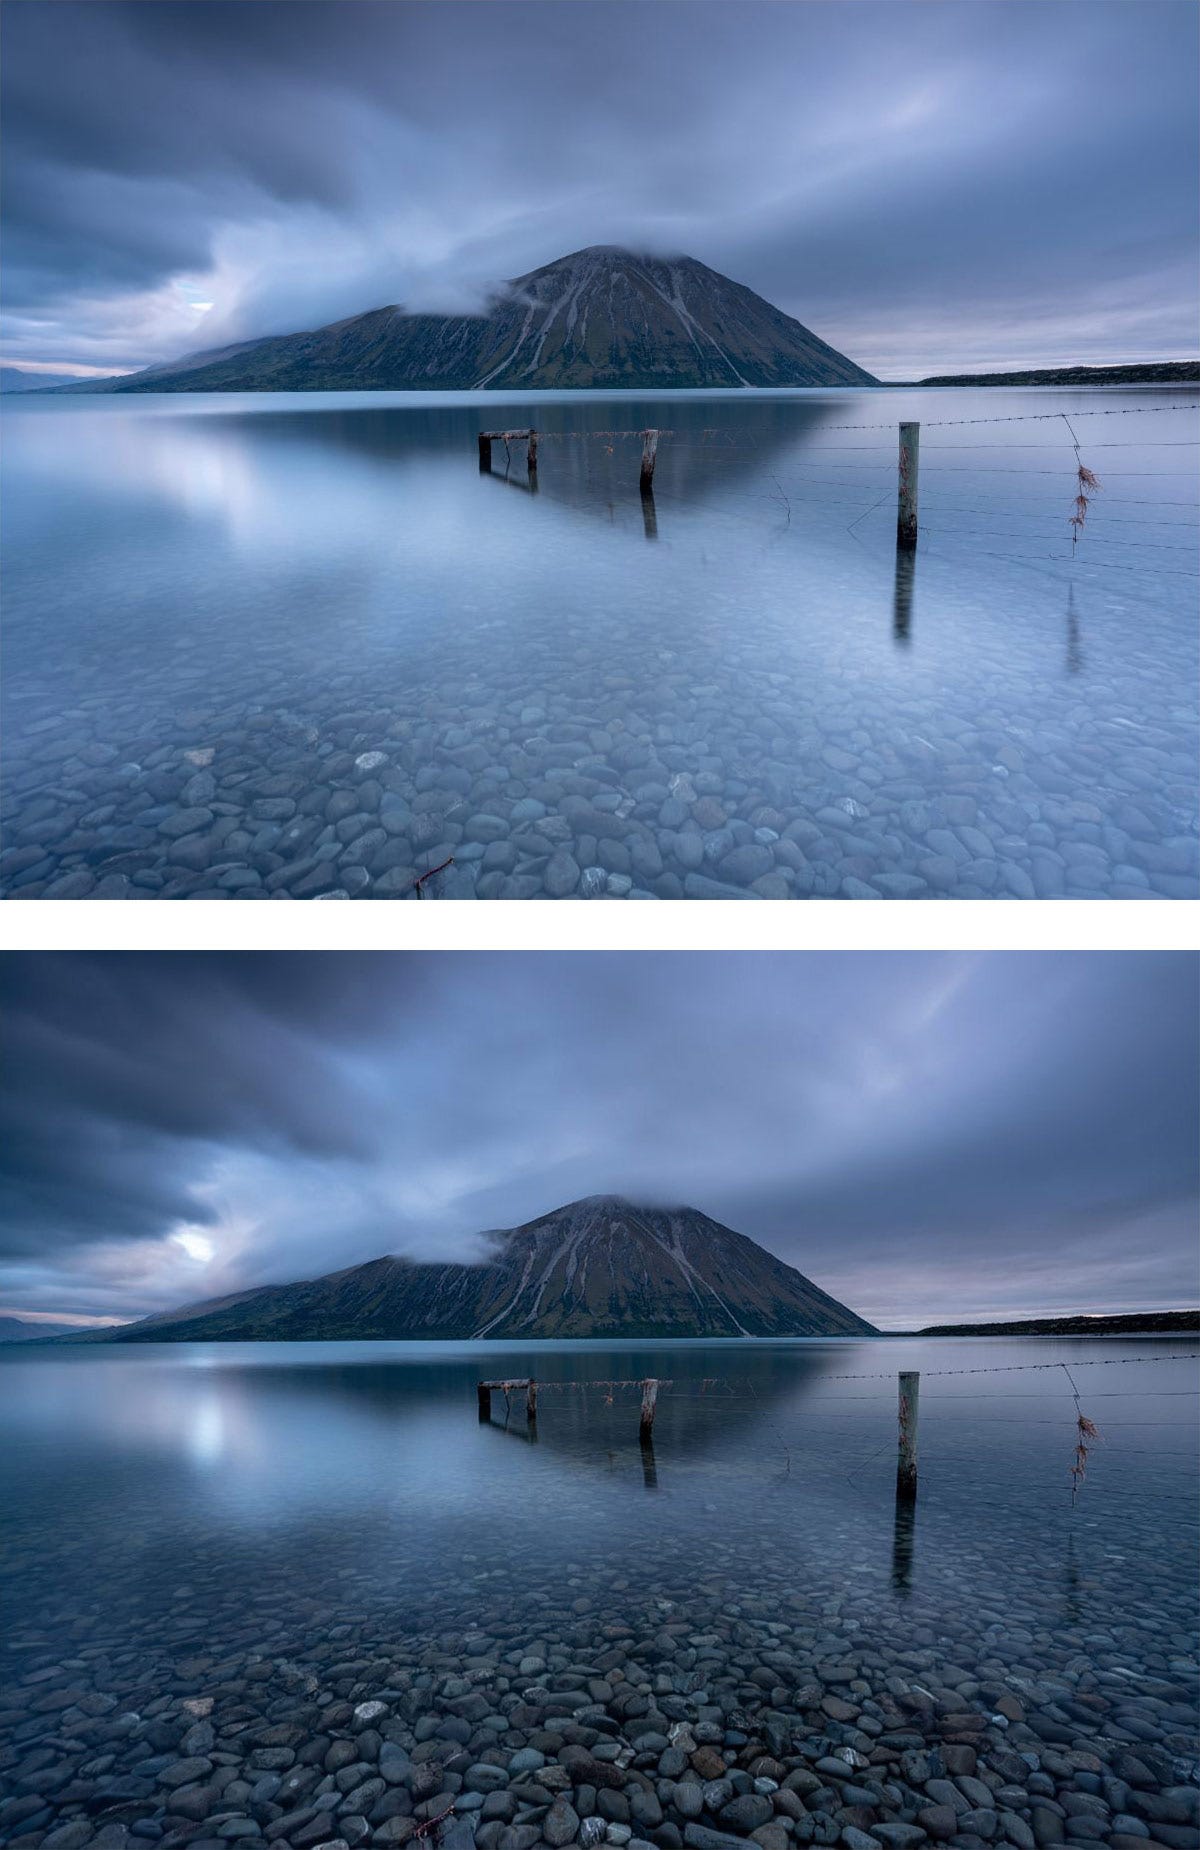
Using an ND1000 (10-Stop) Filter to create the dreamy long exposure look with a shutter speed of 30 sec to 5 mins
When you are shooting the ocean, waterfalls, rivers, streams or other flowing water, the silky smooth effect that a 10-stop ND filter can help you achieve when shooting during the day will help you make your water look dreamy and surreal, and add a sense of time passing into the scenes. The longer your exposure times and the slower your shutter speeds, the smoother the water will be.
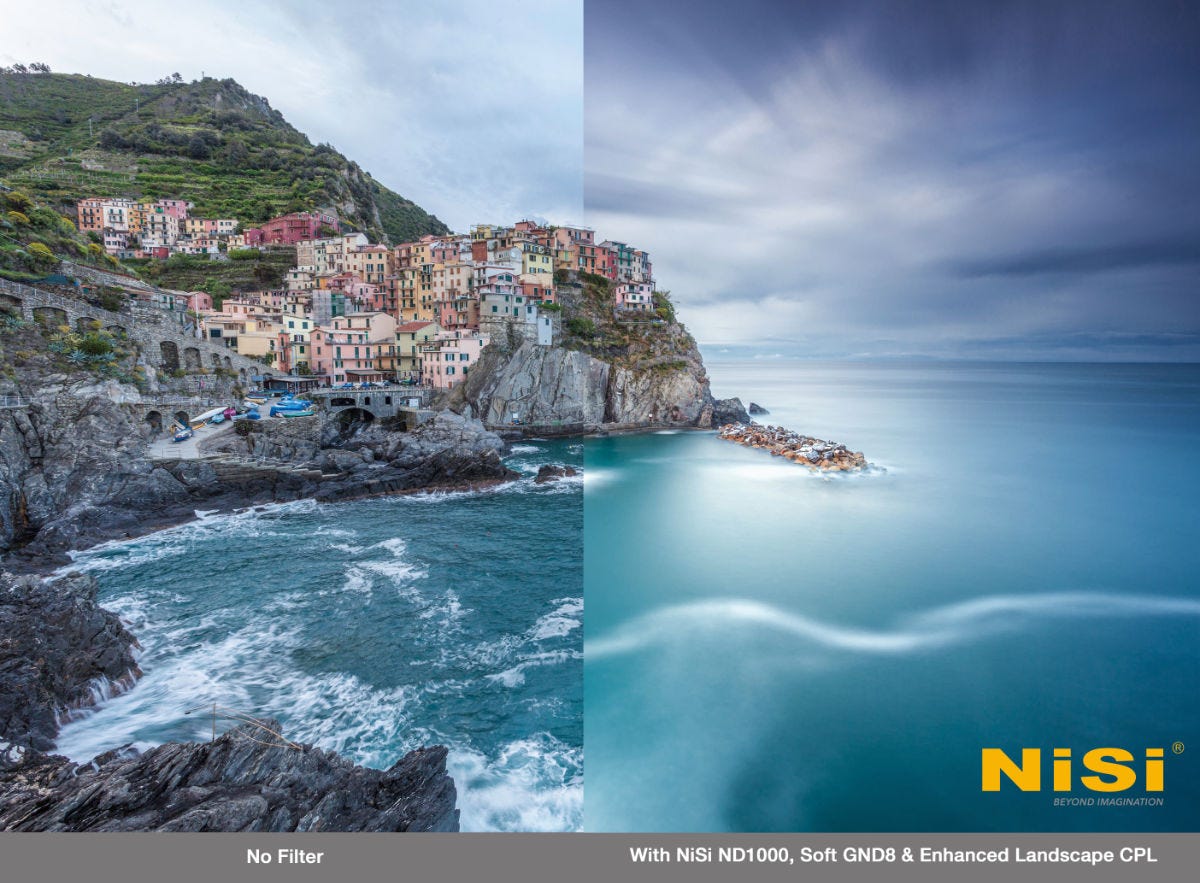
Aiming for a shutter speed of at least 30 seconds will generally create the silky, smooth water effect that long exposure seascape images are known for. In the example image, the side with the 10-stop filter being used was shot at 250 second exposure and this has given both the water and the clouds the dreamy, smooth look. The longer the shutter speed the more dramatic your images will appear. Stability is key when using a ND1000 filter so ensure you have a stable tripod to mount your camera on.
Using an ND32000 (15-Stop) Filter to capture cloud movement during the day with a shutter speed of 3 mins to 10 mins
The middle of the day is often seen as unsuitable for shooting long exposure landscape images due to the bright, harsh and often contrasty light and shadows that are produced when the sun is higher in the sky. By using a 15-stop ND filter you can introduce movement and softness into otherwise harsh lighting conditions that are common throughout the brighter daylight conditions. Cloud movement can be captured across a longer period of time. Water can be smoothed creating a dreamy, artistic effect in your images.
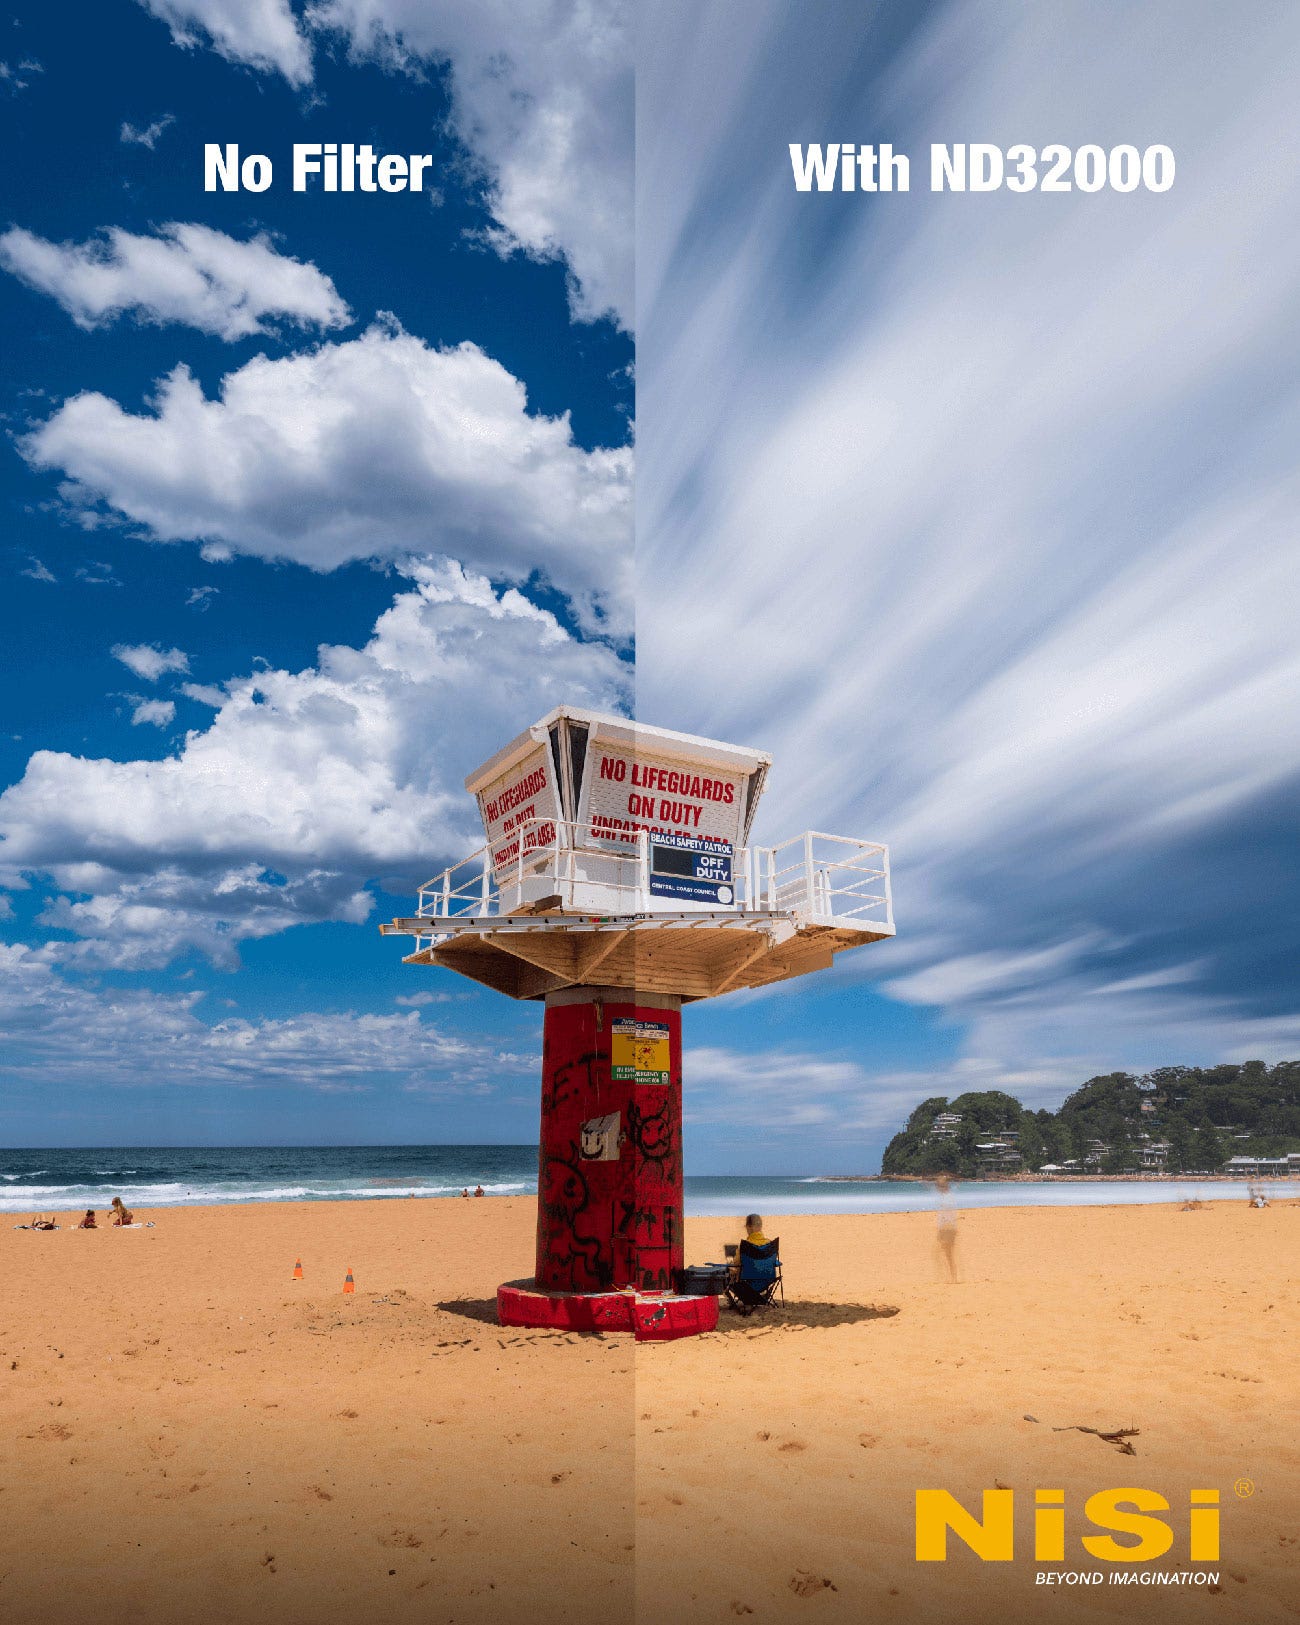
By using an ND32000 filter exposures times in the range of 3 minutes - 10 minutes can easily be achieved during the day. The example image above was captured with a 4 minute exposure time, stretching the moving clouds out for maximum dramatic effect and “removing” people and other moving, non-permanent objects and elements from the scene.
Non-Essential (but Useful) Filters
Graduated Neutral Density (GND) Filters
Natural Night (NN) Filter
Star Soft (SS) Filter
Graduated Neutral Density (GND) Filters
More often than not there is a big difference in the settings required to shoot a foreground when compared to the brighter sky - the foreground will require a longer exposure time due to a reduced amount of light when compared to the sky.
To capture the scene in a single exposure (rather than bracketing exposures) a graduated neutral density filter will help to balance the brighter part of the scene with the foreground by darkening the brighter light and improving contrast. GND filters can be rotated and slid up and down for alignment in a filter holder such as the V7 for situations where the horizon line is not straight, and also when there is brighter light coming from either side of a scene.
There’s certainly challenges in using GNDs, especially when there’s something in your foreground/mid-ground that extends into your sky. For this reason, and with the new masking options available in Lightroom, many photographers opt to bracket exposures and combine in post-processing rather than use GND filters.

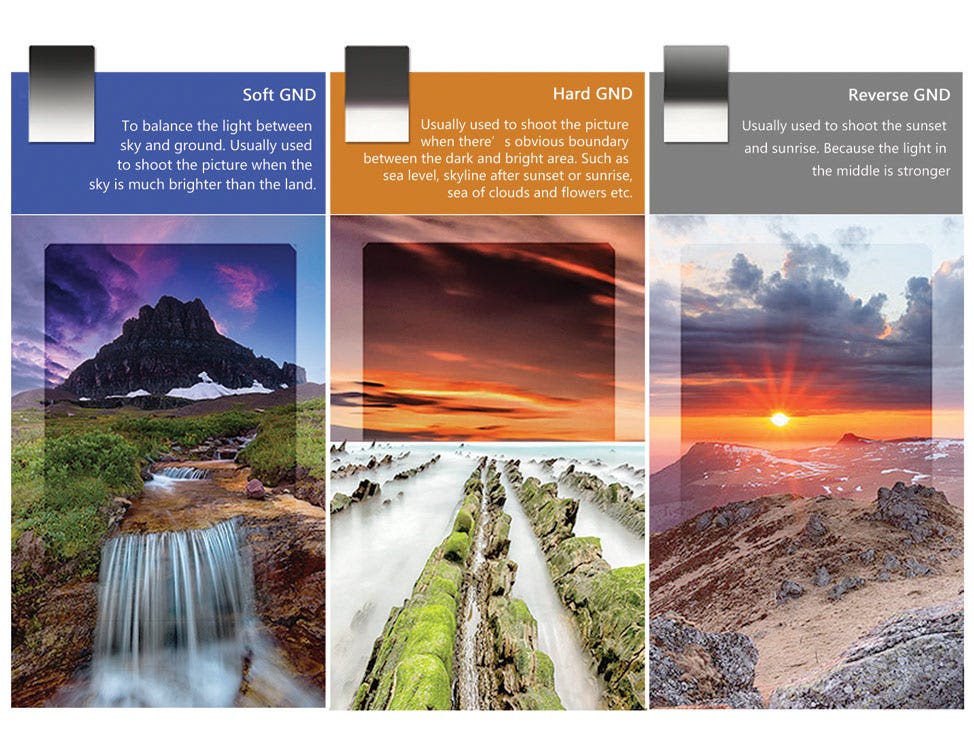
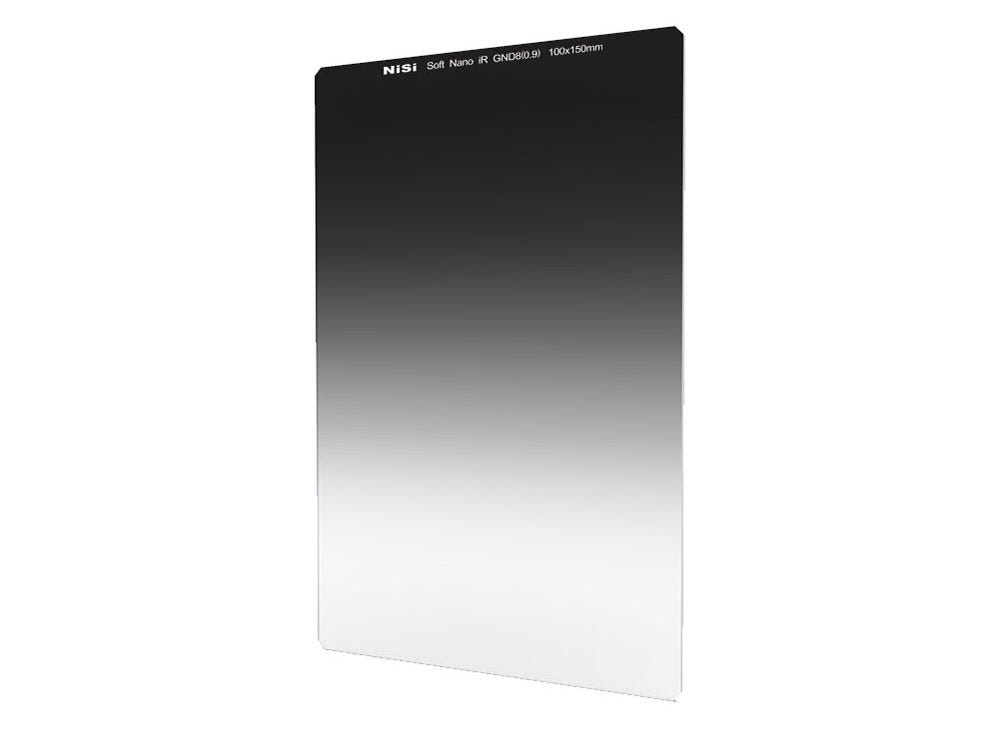
Soft Graduated Neutral Density (GND) Filter
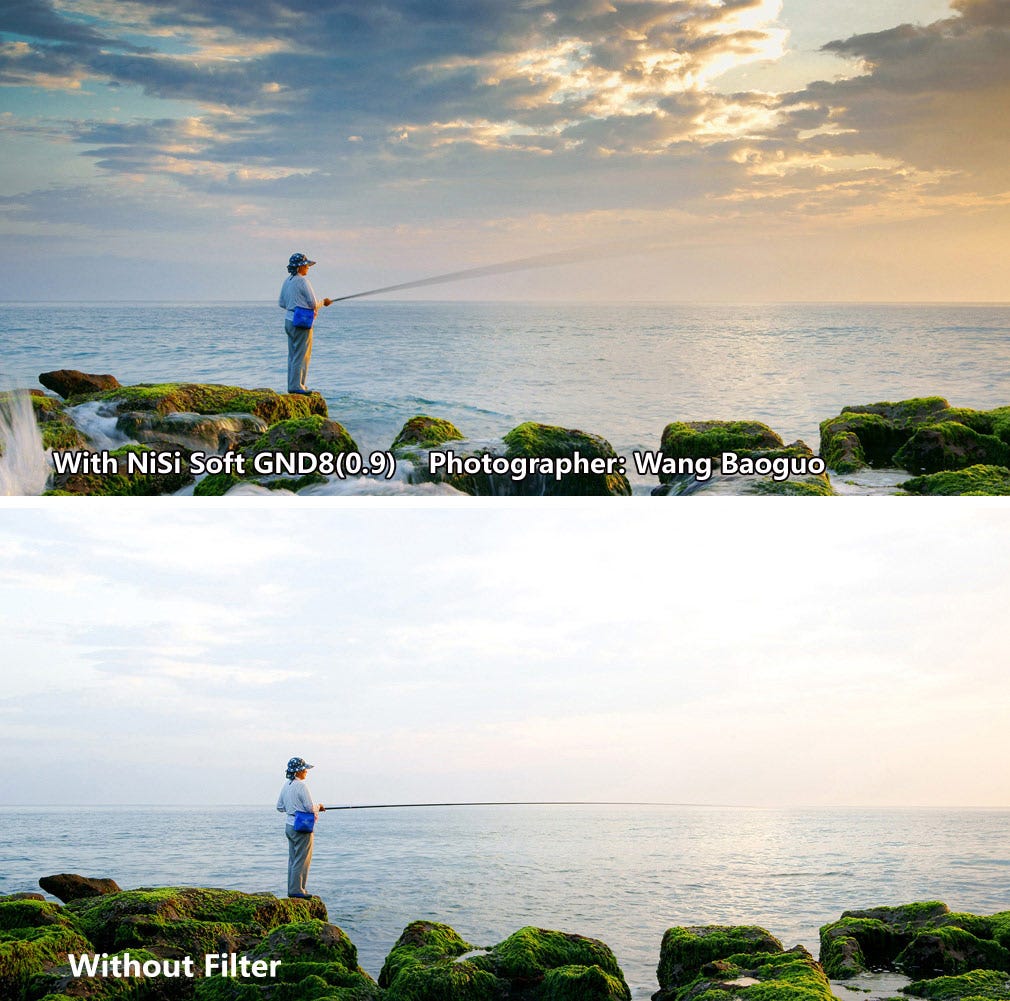
A Soft Graduated Neutral Density Filter, such as the GND8 3-Stop filter, is a rectangular filter that helps to darken specific areas of an image, such as bright skies while allowing for a normal, unaffected exposure in the other regions of the image. The filter is densest at the edge and tapers to clear by the middle, with a soft-edged line of transition between the dense and clear areas. A neutral density filter with a soft-edged line of transition is particularly useful for images that feature trees, buildings, mountains and other elements that protrude into high into the skyline.
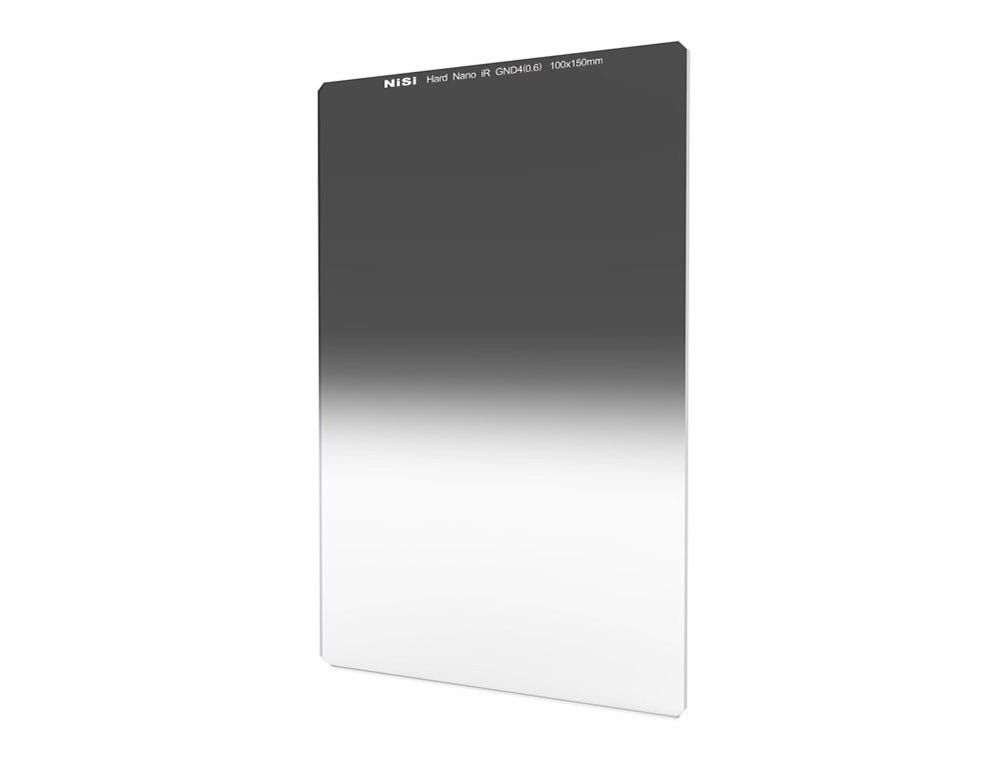
Hard Graduated Neutral Density Filter
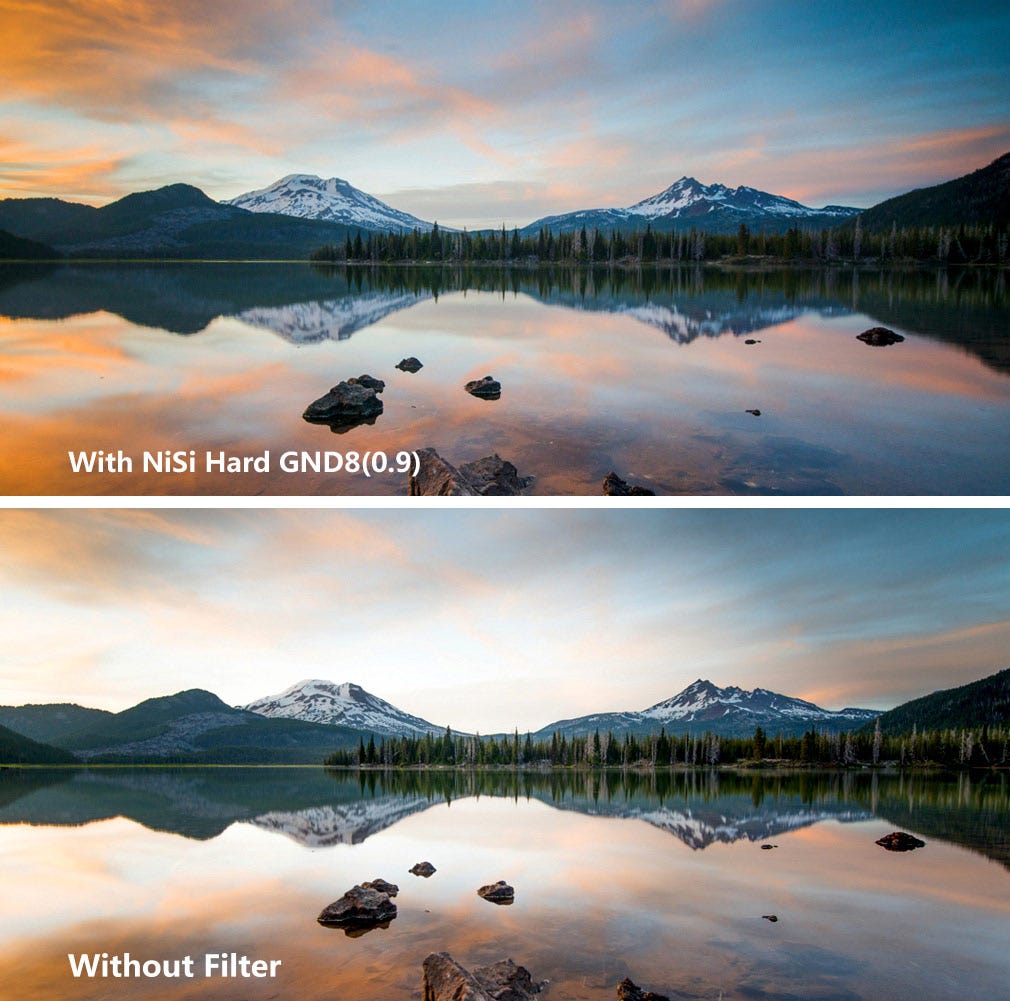
A Hard Graduated Neutral Density Filter, such as the GND4 2-Stop filter is a rectangular filter that helps to darken specific areas of an image, such as bright skies while allowing for a normal, unaffected exposure in the other regions of the image.
The filter is densest at the edge and tapers to clear by the middle, with a hard-edged line of transition between the dense and clear areas. Hard-edged GNDs have a sudden transition from dark to clear.
This type of filter is most appropriate for scenes which have a sudden transition from the foreground to the sky. Most commonly, this would include landscapes with no elements protruding above the horizon such as a seascape looking toward the open ocean.
They can be used shooting into the direct light where a sharp transition is needed. When used shooting away from the light, they can produce very moody and dramatic skies. Avoid using them where elements protrude above the horizon since those elements will appear very dark above the transition line in your image.
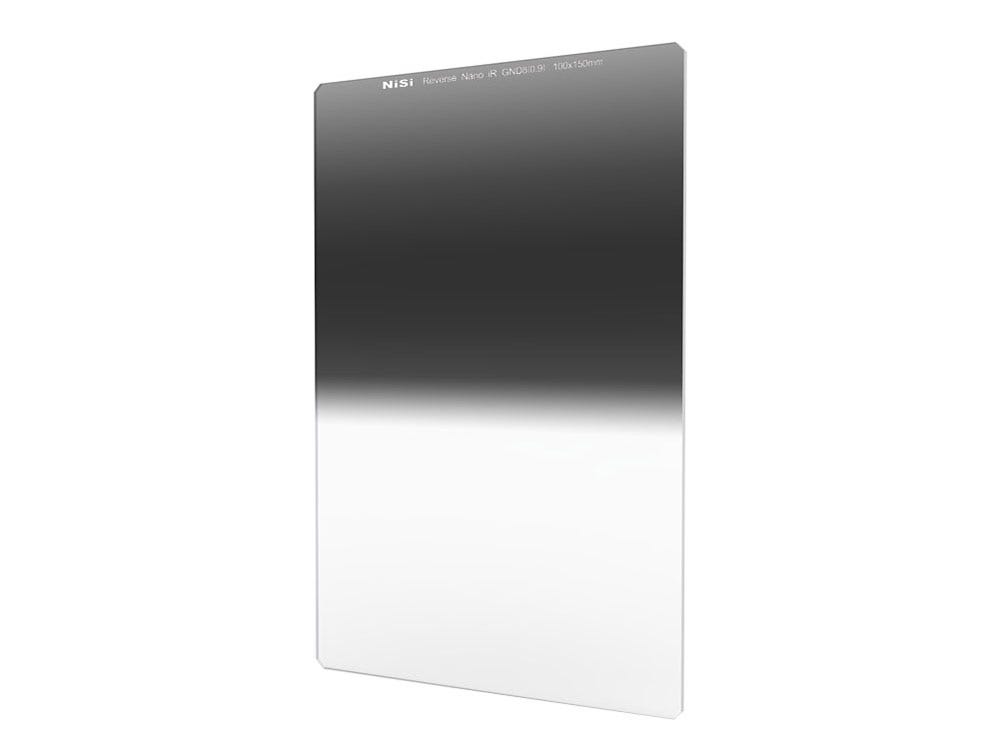
Reverse Graduated Neutral Density Filter
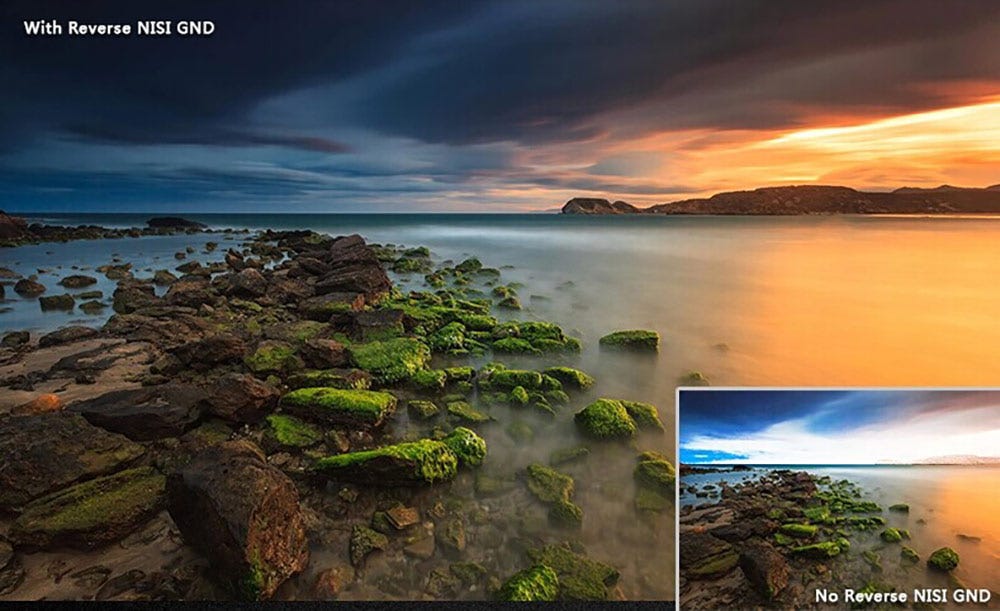
A Reverse Graduated Neutral Density filter, such as the ND8 3-Stop is a rectangular filter that helps to darken specific areas of an image, such as bright skies while allowing for a normal, unaffected exposure in the other regions of the image.
Reverse edged GNDs are similar to hard-edged GNDs except that the darkest part of the filter is at the transition point. These filters have a specific use for shooting at the light source where the light is harshest at the horizon and tapers off toward the sky. This type of filter is most appropriate for scenes which have a sudden transition from the foreground to the sky with the brightest part of the scene near the horizon.
Most commonly, this would include landscapes with no elements protruding above the horizon such as a seascape looking toward the open ocean. They can be used shooting into the direct light where a sharp transition is needed.
Filters for Dark Sky Photography
Natural Night Filter
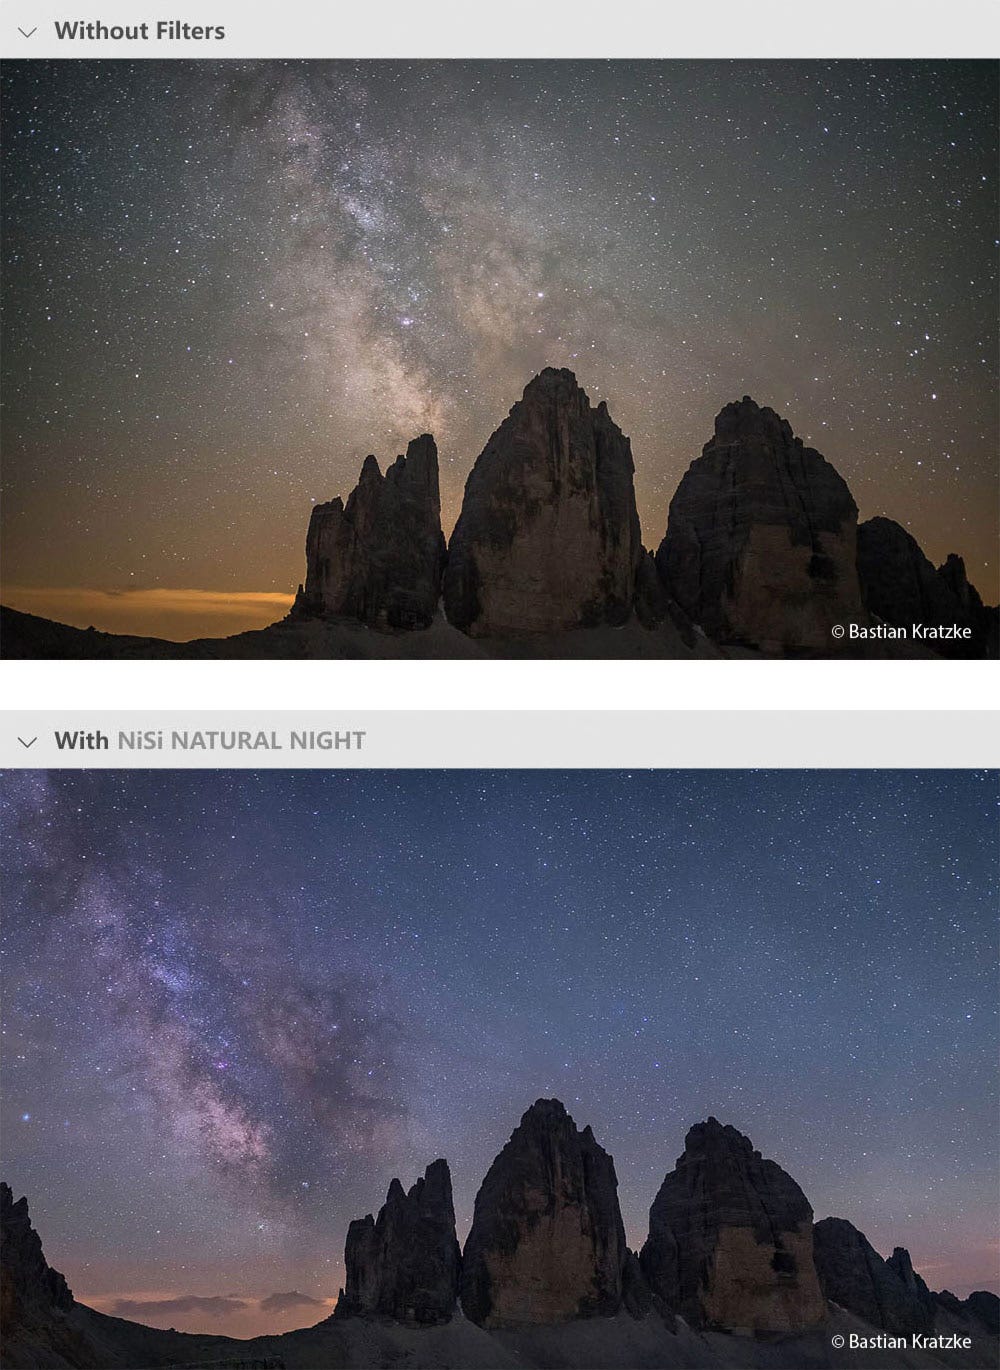
The NiSi Natural Night Filter is designed to reduce the impact of light pollution caused by artificial light sources, particularly from yellow and orange street and city lights, while preserving the remaining colors and details. By blocking the spectrums of light that often cause image quality issues, colors can remain more vibrant and natural, with sharper details throughout due to the reduction of visible light haze.
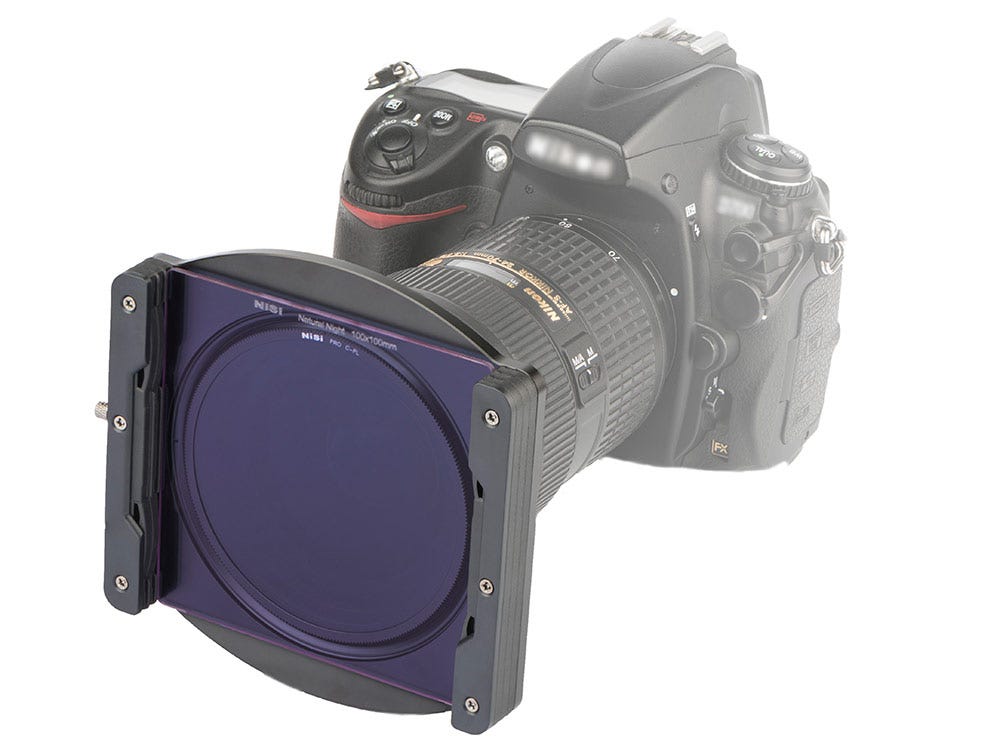
The Natural Night Filter is designed to be used in specific situations, where the night sky is completely dark and there is a noticeable impact from being within, or seeing distant light pollution from city light. It is perfect for cityscapes, and for shooting astrophotography within close visible vicinity of city lights.
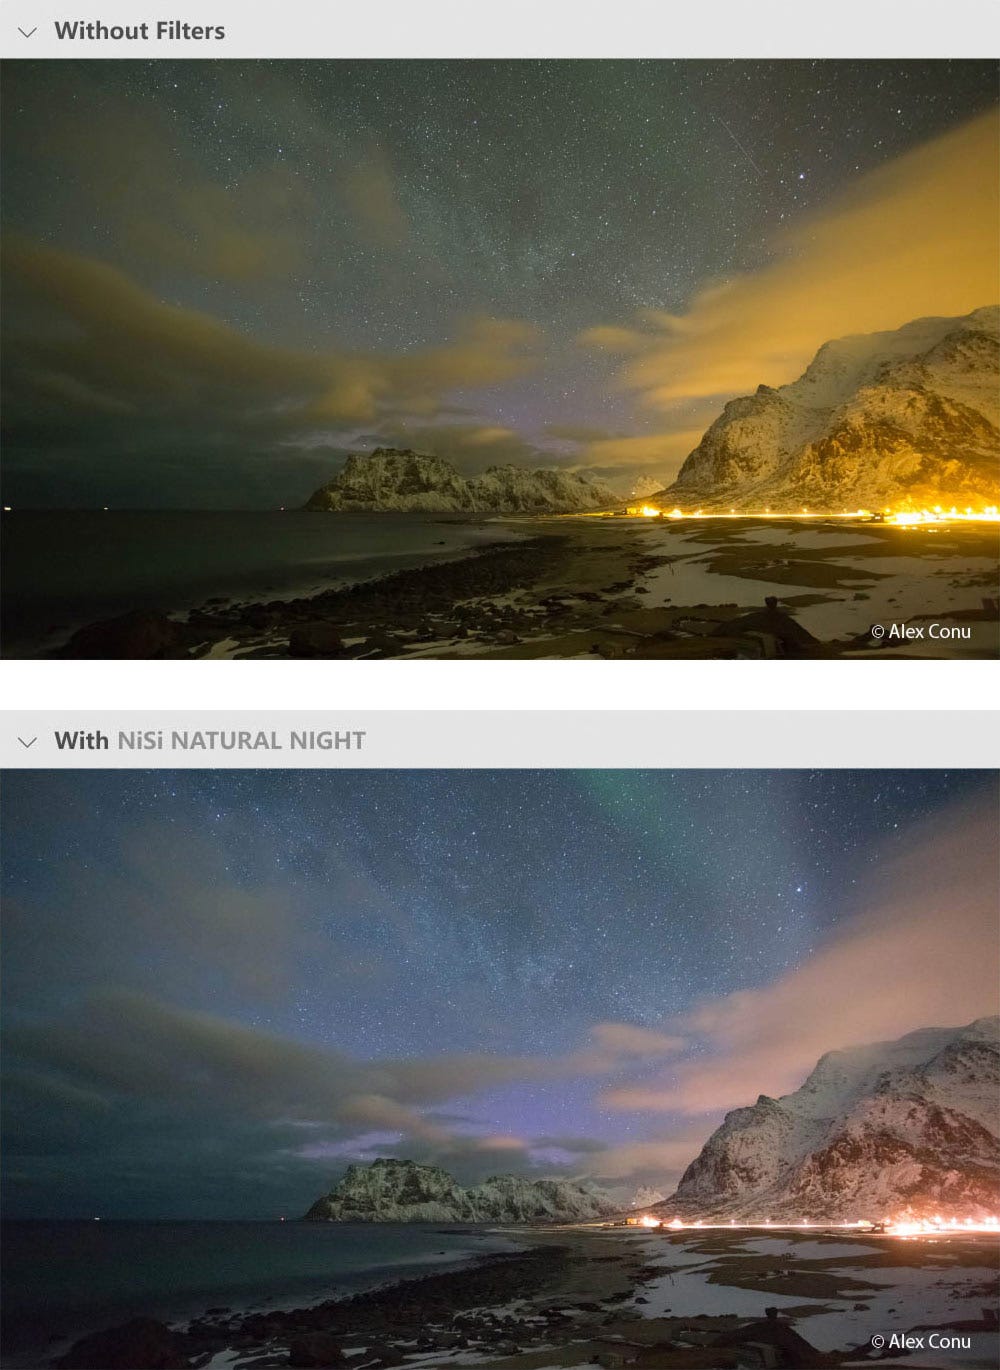
The Natural Night Filter is designed to be used when the sky is completely dark, so shooting after twilight when there is no extra light being cast on the scene by the Sun will produce the best results.
As artificial lighting starts to light up the scene adding a visible haze in the sky, halos around street lights, light reflected across water or distant city lights on the horizon, the Natural Night filter will help to cut through the yellow/orange lighting to maximize the details and clarity throughout your image.
The NiSi Natural Night filter does have a slight impact on your shutter speed of approximately 1/2 stop of light reduction. This means that a night image shot without a filter requiring a shutter speed of 10 seconds may require a 15 seconds shutter speed with the filter on. As shutter speed is critical for maintaining sharp ‘point’ stars with no visible star movement), increasing the ISO may be considered instead.
Star Soft Filter
The Star Soft filter is designed to make stars appear bigger and to make any star constellations stand out in your image. The brighter the star the bigger it will appear.
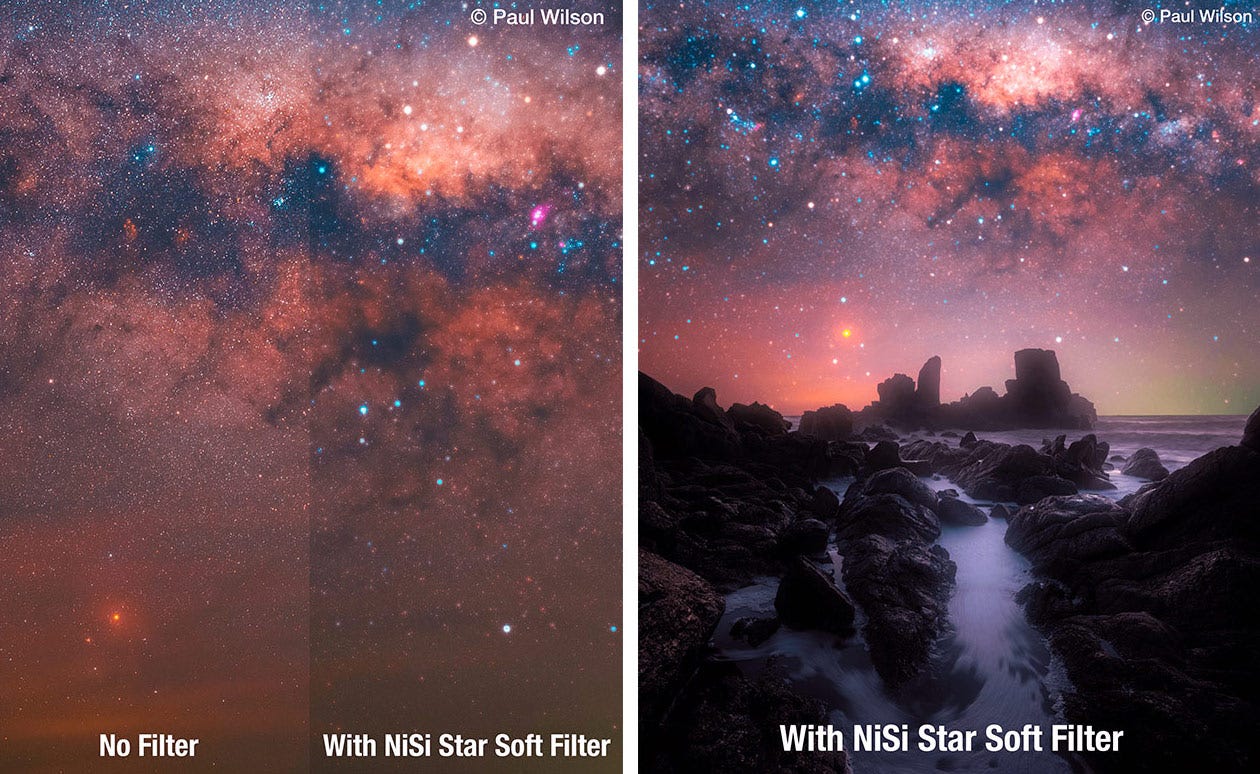
The Star Soft filter is designed just like a GND filter with the effects full strength on the top of the filter, while the bottom is clear with no effect. This allows for placement so the effect can enhance the stars without affecting the foreground.
I hope that this overview of filters and their use for landscape photography was useful. Good quality filters are not cheap, and before investing, I would strongly encourage you to try out some filters and determine for yourself whether you like the affects they create or not.
During my workshops I have a spare set of filters and adaptor rings so participants can try out any of the filters that I mentioned in this article with any of their lenses.
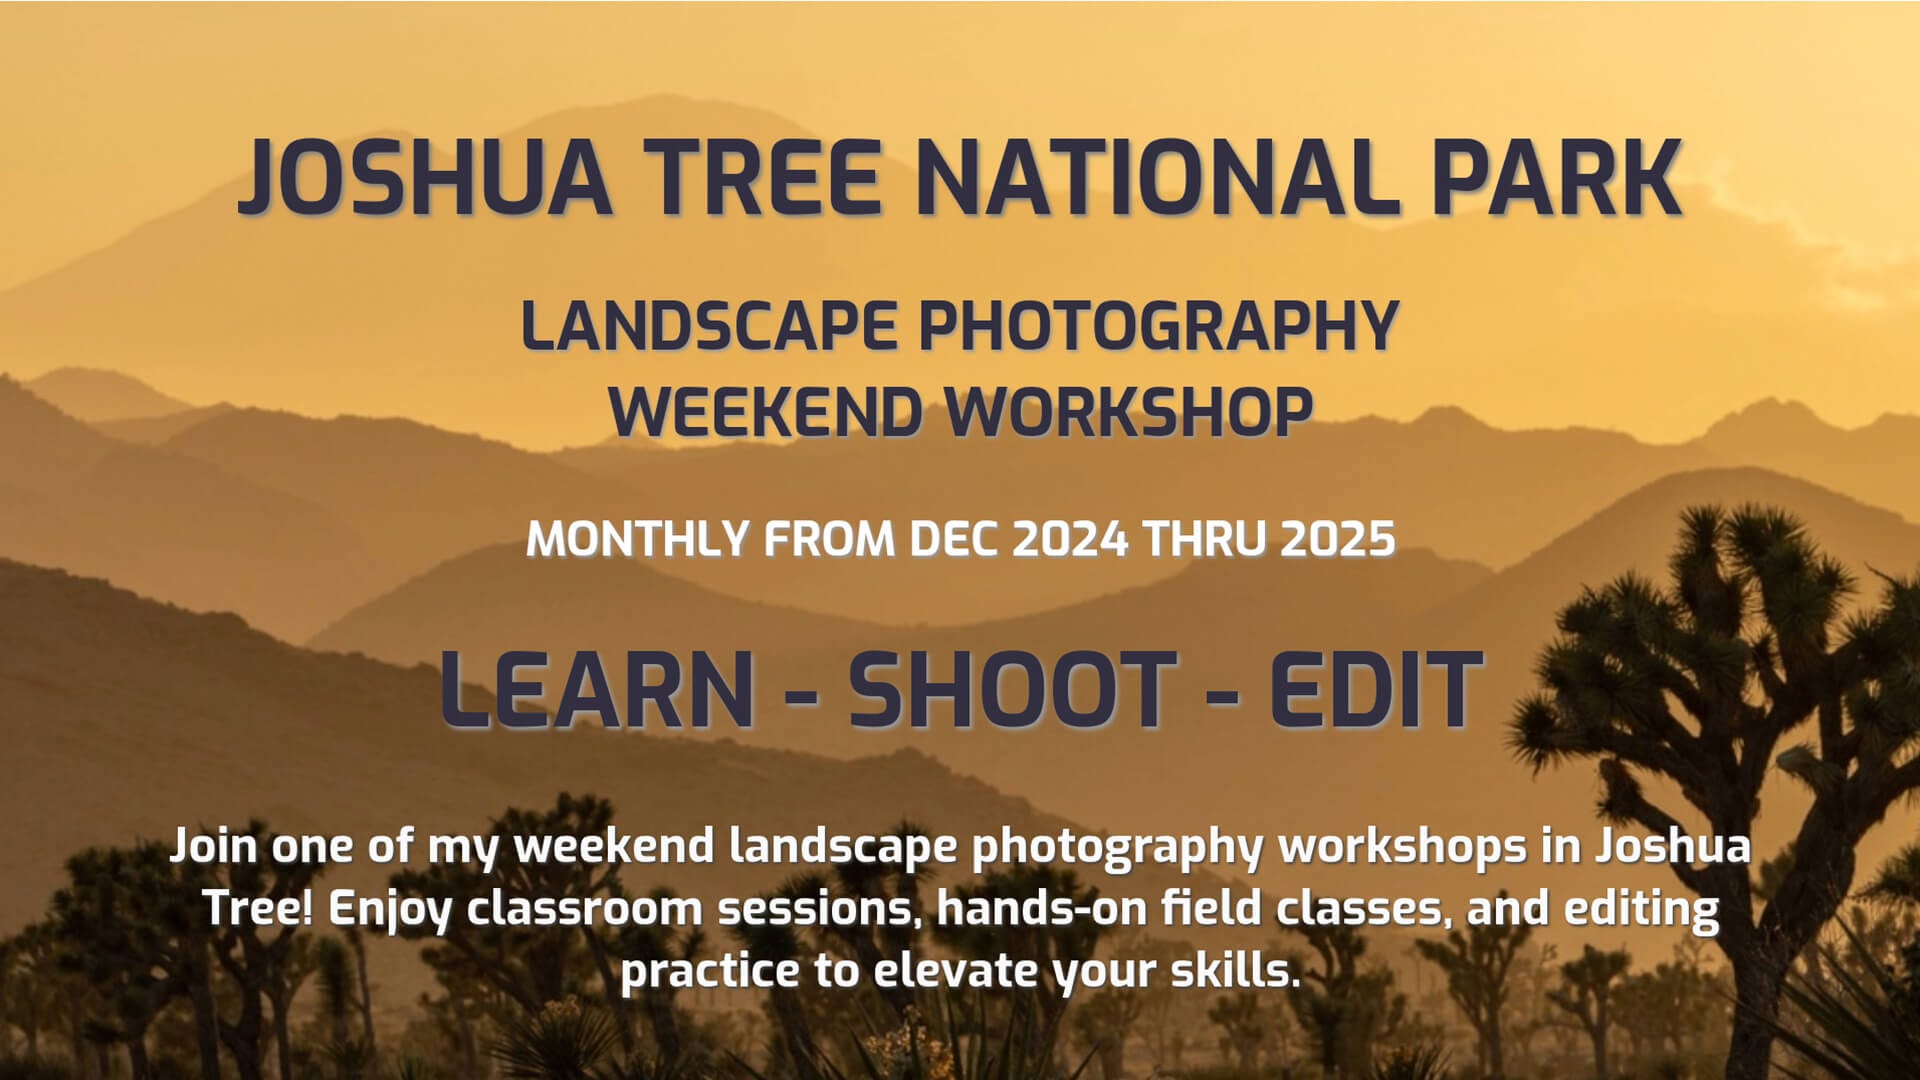
Capture Stunning Landscapes Like a Pro - Join a Joshua Tree Weekend Photography Workshop
Are You Frustrated With Your Photography?
You're passionate about landscape photography, but your shots don’t quite match your vision. Maybe your compositions feel uninspired, or your editing lacks the punch of pro-level images. Watching tutorials isn’t enough—you need hands-on experience and expert feedback to truly improve.
A Weekend That Transforms Your Photography
My immersive Weekend Landscape Photography Workshops in Joshua Tree are designed for photographers who want to level up. Learn directly from an experienced professional, practice techniques in breathtaking desert landscapes, and leave with stunning portfolio-worthy images.
👀 See immediate improvement in your shots
📷 Learn by doing—real-world experience beats theory
💡 Gain expert insights tailored to your needs
Alternatively, you can choose a one-to-one workshop (and personalize it to what you'd like to photograph, specific techniques, or how far you want to hike) or join a small group workshop (limited to three photographers).
Here are a few of my posts that you might be interested in reading:


Interesting musings, images, and art from others:
My Visual Journal #47 by Susanne Helmert
April showers bring Spring greens and birdsong by Michela Griffith
ONE DAY LIKE THIS (Part 17) by Dave Mead
Simple things in a complicated world by Shital Morjaria
They Just Dismantled the Endangered Species Act by Jim Pattiz and More Than Just Parks
Doorways: My Not-So-Secret Photographic Passion by Giles Thurston
Finding Inspiration by Gill Moon Photography
Spring angling for lake trout in the Finger Lakes by Jenn Woltjen
Beachy Head - A Place of Light and Shadow by Lin Gregory
A month offline: How I wrote more than I have all winter in a noisy hospital ward by Margaret Soraya
Good work Jon, and thank you for the shout out.
I carry a polarizer and a 10 or 15-stop solid ND. That’s usually all you need (unless you’re shooting slide film). The usefulness of a polarizer to remove glare from water and foliage can not be overstated.